Friday, April 19, 2024

PTU CT TL and Tag for Charmed Designs

    *~*CT FB Timeline and Tag for Charmed Designs*~*

I am using her Beautiful Scrap kit 
 "Pearfully Pretty " by Charmed Designs 
It has 4 AI generated tubes by Charmed Designs

 HERE   HERE   
This kit is for personal use ONLY.


Thursday, April 18, 2024

PTU Serene Soul


 This tut was written April 18th, 2024 for those with a basic knowledge of psp. 

Awesome AI kit and tube by Midnight Shadow Dezinez

Everything used is included in the kit
Read the TOU on how to credit your tags

I used PSP2020...but any of them should work.
PTU Scrap Serene Soul by Midnight Shadow Dezinez  HERE  HERE  
Everything used is included in the kit
You can find all Midnight Shadow Dezinez kits  HERE
Mask of choice I used RD Mask 756 HERE
Check out the rest of the blog HERE
Vivienne's Digital Tagging Mask 78 HERE
Check out the rest of the blog HERE
Filters
Mura Meister Copies-Encircle

 Font of choice, I used Action is

Drop shadow as you go is V -2 H -4, 50, 10, or use what you prefer.
Let's get started
*Remember to add your drop shadow as you go along*

Open a new image 800 x 800, resize paper 8 to 80%, paste, apply
your mask.
Open paper 8, paste mask 78 on the sand area, invert, delete, move to the 
bottom left, duplicate, mirror.

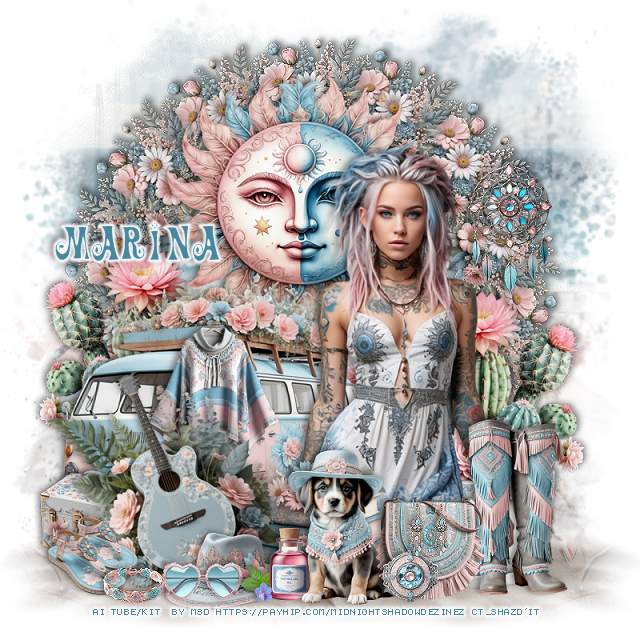
Resize element 33 to 25%, apply Mura Meister Copies-Encircle first
3 numbers on 14, 60, 60, paste.
Resize element 21 to 60%, paste on the upper left.
Resize element 54 to 75%, paste on the bottom left.
Resize element 20 to 70%, paste behind the van on the left, duplicate,
mirror, move down a little.

Resize your tube to 85%, paste on the right above the van.

Resize element 27 to 40%, paste at the bottom right above the tube.
Resize element 3 to 25%, paste at the bottom by the boots.
Resize element 18 to 30%, paste at the bottom above the tube.
Resize element 29 to 50%, paste on the bottom left above the van, free rotate
to the left at 20.
Resize element 11 to 25%, paste at the bottom left behind the guitar.

Resize element 26 to 20%, paste at the bottom left above the guitar.
Resize element 5 to 30%, paste at the bottom.
Resize element 14 to 20%, paste at the bottom on the hat.
Resize element 7 to 35%, paste at the bottom.
Resize element 9 to 15%, paste at the bottom.
Resize element 10 to 15%, paste on the purse.
Resize element 8 to 30%, paste on the left above the van.
Resize element 53 to 20%, paste at the bottom behind the dog.
Resize element 48 to 15%, paste at the bottom left.
Paste element 32 to 35%, paste on the upper right on the flower circle.

Add any other elements that you would like, make it your own.
Always readjust your mask and elements how you like them before you
 merge your tag, resize, sharpen.

Crop your tag to be sure no shadows or lines are on the edges.
 Then add your copyright and name.
That's it

Hope you enjoyed doing my tut      

PTU Paris In Bloom


  This tut was written April 18th, 2024 for those with a basic knowledge of psp. 

I am using the awesome tube by ©Verymany

The tube is called Spring Flowers 3
You need a license to use this tube, please do not use without a license.
You can find the tube at VMT HERE

I used PSP2020...but any of them should work.
PTU Scrap Paris in Bloom by Wicked Princess Scraps  HERE 
"Tube is NOT included"
You can find all Wicked Princess Scraps kits  HERE
Mask of choice, I used Miz Teeques Mask 63 HERE
Check out the rest of the blog HERE
Filters
Mura Meister Copies-Encircle 

 Font of choice, I used Broken Heart

Drop shadow as you go is V -2 H -4, 40, 10, or use what you prefer.
Let's get started
*Remember to add your drop shadow as you go along*

Open a new image 800 x 800, paste paper 13, apply your mask, duplicate,
change the blend mode to Multiply, merge down.

Resize element 143 to 25%, apply Mura Meister Copies-Encircle,
first 3 numbers on 16, 60, 60, paste.
Paste element 179 at the top.
Resize element 160 to 75%, paste.
Duplicate the flower circle, move to the bottom layer at the top.

Resize your tube to 35%, paste to the right.

Resize element 153 to 35%, paste at the bottom right above the tube.
Resize element 65 to 25%, paste at the bottom above the tube.
Resize element 66 to 35%, paste at the bottom above tray.
Resize element 70 to 25%, paste at the bottom.
Resize element 142 and 162 to 20%, paste at the bottom.
Resize element 64 to 40%, paste at the bottom left.
Resize element 143 to 25%, paste behind the tube on the right, duplicate,
mirror.

Resize element 150 and 170 to 25%, paste at the bottom right being on 
the top layer.
Resize element 140 to 50%, paste behind the tube on the right.
Resize element 103 to 20%, paste at the bottom left, duplicate, move over.
Resize element 75 to 25%, paste at the bottom right.
Resize element 94 to 25%, paste on the bench behind the tube, erase some that
is over the arm of the bench.
Resize element 149 to 20%, paste at the bottom.
Resize element 275 to 15%, paste at the bottom.

Add any other elements that you would like, make it your own.
Always readjust your mask and elements how you like them before you
 merge your tag, resize, sharpen.

Crop your tag to be sure no shadows or lines are on the edges.
 Then add your copyright and name.
That's it

Hope you enjoyed doing my tut

Tag for Shani