Wednesday, October 31, 2018

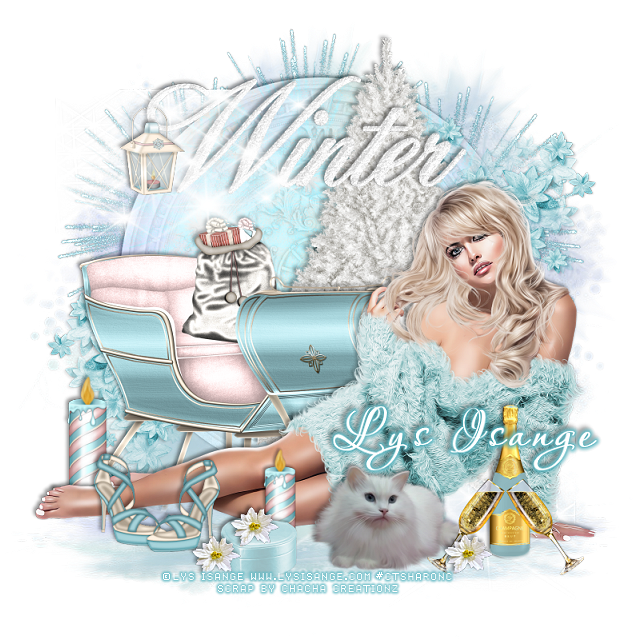
PTU B.B Beauty


This tut was written Oct 31st, 2018, for those with a basic knowledge of psp.
I am using the awesome tube by artist Lys Isange
Tube is called "BB " Exclusive at her store
She comes in 9 different colors
 You need a license to use this art, please do not use without a license.
You can find this tube at her store HERE

I used PSPX...but any of them should work.
I paired it with a PTU kit Glam Winter by ChaCha Creationz at S&CO  HERE
RD Mask 753  HERE
Check out the rest of the blog  HERE

Font of choice,  I used Aquarelle

Drop shadow is usually V-2 H-2 Black, 50, 5, use what you prefer.
Let's get started
*Remember to add your drop shadow as you go along*

Open a new image 800 x 800
Paste paper 6, apply your mask, delete, merge group, duplicate the mask,
take your Pick tool, hold the shift key and drag down the top square 
on one side and then the other to make it flat, move to the bottom.

Resize your tube to 25%, paste on the bottom on the flatten mask.
Paste element 4 on the mask layer, change the blend mode to Luminance(L).

Paste element 19 behind the tube to the left.
Resize element 13 to 40%, paste at the bottom left above the tube.
Paste element 6 below the sleigh a little off center to the right.

Resize element 1 to 40%, paste at the bottom above the tube more to the right.
Resize element 6 to 40%, paste by the cat. 
Resize element 62 to 40%, paste above the champagne bottle. 
Change the color of the champagne bottle to match the tag.

Paste element 34 at the top above the tree layer.
Resize element 45 to 25%, paste on the wordart at the left, erase a little of the hanger part.
Resize element 29 to 25%, paste at the bottom above the shoe layer.
Resize element 14 to 15%, paste on the box, duplicate a couple more times, place
where you like on the bottom.

Paste element 93 on the left below the clock layer, duplicate, mirror, duplicate again,
move to the center and down some.
Paste element 30 oh the lower left above the clock, duplicate, mirror, move
up more behind the tube.

Resize element 39 to 40%, paste on the left behind the feet of the tube, duplicate,
resize to 80%, move above the tube and behind the small box.
Paste element 98 below the tube layer.

Add any other elements you would like.

Once happy with your tag, close off any background, crop your tag to make
sure there are no stray edges, merge visible, resize first.
Add your copyrights and name.

That's it
Hope you enjoyed doing my tut.


Tuesday, October 30, 2018

PTU Pumpkin Spiced Latte


This tut was written Oct 30th, 2018 for those with a basic knowledge of psp.
I am using the awesome artwork of Fiodorova Maria
The tube is called "Alex"
This is an Exclusive tube.
You need a license to use this tube, do not use without a license.
You can find this tube at PFD store  HERE

I used PSPX...but any of them should work.
PTU kit Pumpkin Spiced Latte by All Dolled Up  HERE HERE, HERE or HERE
RD Mask Set 756 HERE
Check out the rest of the blog  HERE
Filter

Font of choice,  I used Akhenaton

Drop shadow is usually V-2 H-2 Black, 50, 5, use what you prefer.
Let's get started
*Remember to add your drop shadow as you go along*

Open a new image 800 x 800
 Paste paper 6, apply your mask, delete, merge group.

Paste element 74 on the mask, click inside with the magic wand,
expand by 5, paste paper 5, invert, delete, select none. 
Change the blend mode to Hard Light.

Resize your tube to 25%, paste toward the bottom.

Resize element 68 to 40%, paste at the lower left above the tube, duplicate,
mirror, duplicate again, move below the tube how you like.
Resize element 18 to 25%, paste below the tube to the right, duplicate, 
mirror, adjust behind the tube on the left.
Resize element 5 to 25%, paste above the first pumpkin and to the
right a bit.

Mirror element 22, paste on the right on the mask layer, duplicate, resize
to 70%, mirror, adjust on the left behind the tube.
Resize element 143 to 20%, paste at the bottom being on the top layer by 
the tube.
Resize element 4 to 15%, paste below the cup later to the left.

Resize element 23 to 25%, paste at the bottom above the cup layer.
Resize element 55 to 20%, mirror, paste at the lower left.
Resize element 92 to 20%, paste at the lower left below the squirrel layer.

Resize element 142 to 35%, paste at the lower right being on the top layer.
Resize element 75 to 30%, mirror, paste on the right below the pumpkins.

Resize element 52 to 10%, paste at the bottom above the cup.
Resize element 49 to 40%, mirror, paste above the tree layers and down so 
the small pumpkin shows behind the tube, duplicate, move to the left more
behind the mushroom.

Resize element 78 to 50%, paste on the tree on the right, duplicate, mirror, 
resize to 90%, paste on the small tree on the left.
Resize element 128 to 25%, paste on the cup for the steam effect, erase the bottom
pointy part.

Resize element 146 to 50%, mirror, move the left so just the pumpkin on the
stool shows.
Resize element 147 to 50%, mirror, paste above the other pumpkins on the 
right by the boot of the tube.
Resize element 110 to 15%, paste at the lower right above the book layer.
Resize element 132 to 15%, paste on the lower left below the bucket.
Paste element 93 at the bottom just above the mask layer on one side, duplicate, mirror.

Resize element 125 to 55%, flip, paste at the top below the paper layer of the 
frame on one side, duplicate, mirror, duplicate the right one, free rotate to the right at
90 degrees, move down on the right side, duplicate, mirror, duplicate each side ones,
move down and erase the part showing at the bottom, adjust all to your liking.
Resize element 80 to 10%, paste on the pumpkin on the right, duplicate a couple more
times and place where you like. 

Duplicate a few more times and move below the tube layer and place how you like.
Resize element 139 to 50%, paste on the right below the pumpkins so some of 
the leaves shows, duplicate, move to the left and having some of the leaves showing.
Paste element 21 on the tree layers how you like.

Add any other elements that you would like, make it your own.

Once happy, close off any background you had.
 Crop your tag to get rid of any stray edges, merge visible.
Resize, sharpen, add your Copyright and name.

That's it
Hope you enjoyed doing my tut.


Sunday, October 28, 2018

PTU Dark Glamour


This tut was written Oct 28th, 2018, for those with a basic knowledge of psp.
I am using the awesome tube by artist Lys Isange
Tube is called "Dark Glamor " Exclusive at her store
 You need a license to use this art, please do not use without a license.
You can find this tube at her store HERE

I used PSPX...but any of them should work.
I paired it with a PTU kit Gothika by LMB at S&CO  HERE
RD Mask 753  HERE
Check out the rest of the blog  HERE
xero-Bad Dream

Font of choice,  I used Stalemate

Drop shadow is usually V-2 H-2 Black, 50, 5, use what you prefer.
Let's get started
*Remember to add your drop shadow as you go along*

Open a new image 800 x 800
Paste paper 11, apply your mask, delete, merge group.

Resize your tube to 23%, paste to the right more.

Resize element 44 to 90%, paste behind the tube to the left, click inside
with the magic wand, expand by 5, paste paper 1, invert, delete, keep selected.
Mirror your close up tube, resize to 80%, paste, delete, select none.
Apply the xero filter-Bad Dream, then change the blend mode to Luminance(L).

Resize element 31 to 75%, paste on the right behind the tube at the bottom,
duplicate, move above the tube, resize to 75%, duplicate again and move over more.

Paste element 88 at the bottom below the wheel on the right, duplicate, mirror.
Paste element 81 on the right below the paper layer of the frame, duplicate, mirror.

Resize element 34 to 50%, paste on the right below the grass layer, 
duplicate, mirror.
Resize element 62 to 25%, paste at the lower left below the tube by the foot,
duplicate, move to the right more above the tube.
Resize element 38 to 50%, free rotate to the left at 90 degrees, paste on the right
below the black flowers, duplicate, mirror.
Resize element 29 to 40%, paste at the bottom above the grass layers.

Resize element 72 to 75%, paste on the right below the wheel layer.
Paste element 87 below the mask layer and move up so some shows at the top,
duplicate, move over more, duplicate both trees, move each one to the edge on each side.

Once happy with your tag, close off any background, crop your tag to make
sure there are no stray edges, merge visible, resize first.
Add your copyrights and name.

That's it
Hope you enjoyed doing my tut.