Thursday, March 18, 2021

FTU Spring Fever


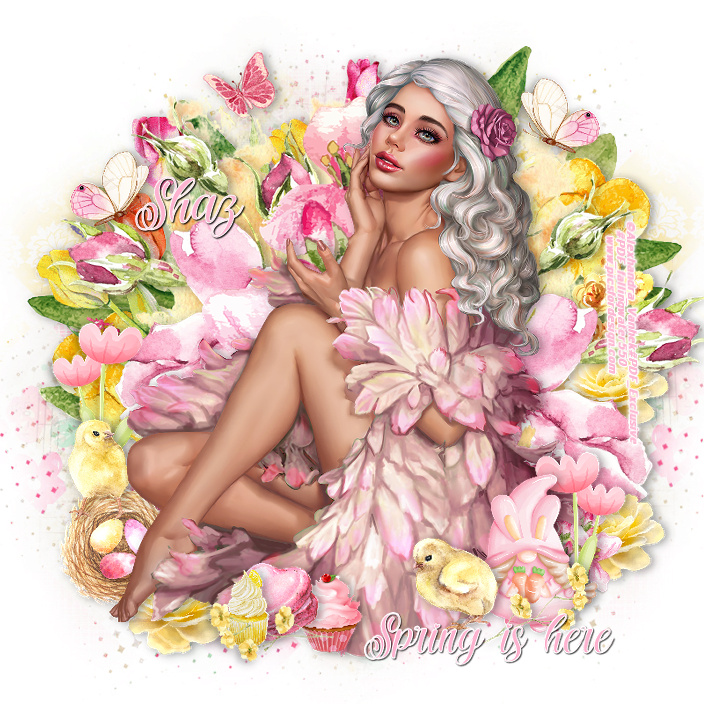
This tut was written March 18th, 2021 for those with a basic knowledge of psp.

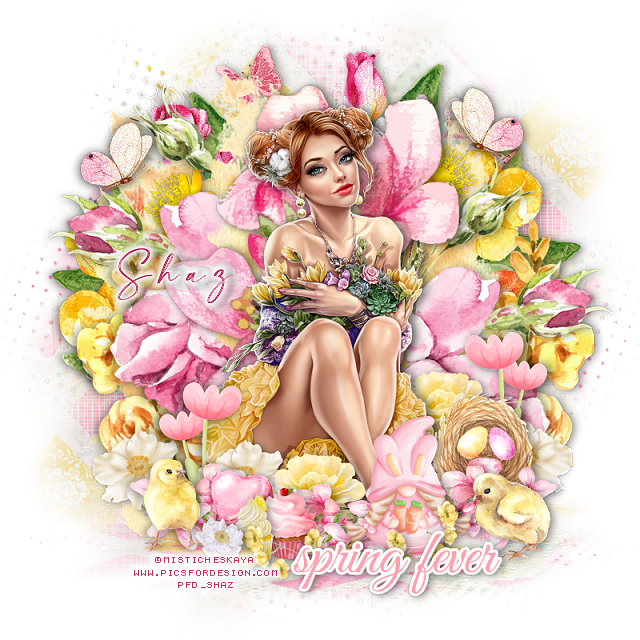
I am using the awesome artwork of  Misticheskaya
The tube is called "Ann" 
You need a license to use this tube, do not use without a license.
You can find this tube at PFD store  HERE

I used PSPX6...but any of them should work.
FTU kit Spring Fever by Tiny Turtle Designs at Celestial Scraps  HERE
You will have to register at the store to get the free scrap
Check out the rest of the Store  HERE
Dragonfly PSP Mask 30 HERE
Check out the rest of the blog HERE
Filters
xero-Artwork 

Font of choice,  I used La Beauties

Drop shadow is  V 1 H 4, 40, 15, or use what you prefer.
Let's get started
*Remember to add your drop shadow as you go along*

Open a new image 800 x 800 or a size you prefer, can always resize later.
Paste paper 11, apply your mask, delete, merge group, duplicate, mirror, duplicate, flip,
move down on the left.
Duplicate the first mask, take your Pick Tool, hold the shift key and drag down on
of the top squares and then the other until as flat as you like, move to the bottom.

Paste element 8, apply xero filter-Artwork, change the first number to 30.
Paste element 69 on the mask layer on the right, duplicate, mirror, adjust more 
later.

Resize element 5 to 50%, paste at the upper right above the basket of flowers,
duplicate, mirror, move down more.
Resize element 35 to 75%, paste on the right and down, duplicate, mirror, move 
up on the left.

Paste element 28 on the left below the large pink flower, duplicate, move
to the center above the large pink flowers, duplicate, mirror, move on the right
below the large pink flower. Erase any stems at the bottom showing.
I didn't add a drop shadow on these.
Resize element 51 to 85%, paste being on the top layer center.

Resize your tube to 30%, paste.

Resize element 81 to 60%, paste on the right below the flowers toward the bottom,
duplicate, mirror.
Resize element 12 to 20%, paste below the tube on the right, duplicate, move
above the tube by her foot.
Resize element 79 to 20%, paste below the flower by her foot, duplicate, move 
to the left below the tube layer, duplicate, mirror, adjust on the right.

Resize element 51 to 25%, paste at the bottom being on the top layer, duplicate, 
move to the right, duplicate, mirror.
Resize element 65 to 30%, paste at the bottom being on the top layer.
Resize element 19 to 25%, paste on the right below the small pink flowers.
Resize element 11 to 20%, paste at the lower right being on the top layer again.
Resize element 10 to 20%, mirror, paste on the left.

Resize element 36, 37 and 53 to 15%, paste at the bottom.
Resize element 83 to 10%, paste at the bottom by the cupcakes.
Resize element 88 to 20%, paste at the bottom to the right above the little gnome,
duplicate, mirror, free rotate to the left at 25 degrees, move by the cupcakes.

I use wordart element 34, resized to 50%, paste at the bottom being on the top layer.
Use wordart of choice.
Resize element 30 to 15%, paste on the left, duplicate, mirror.
Resize element 66 to 30%, paste on one side below some flowers, duplicate, mirror.

Add any other elements that you would like, make it your own.
Always readjust your mask and elements how you like them before you
 merge your tag, resize, sharpen.

 Then add your copyright and name.
That's it

Hope you enjoyed doing my tut.   

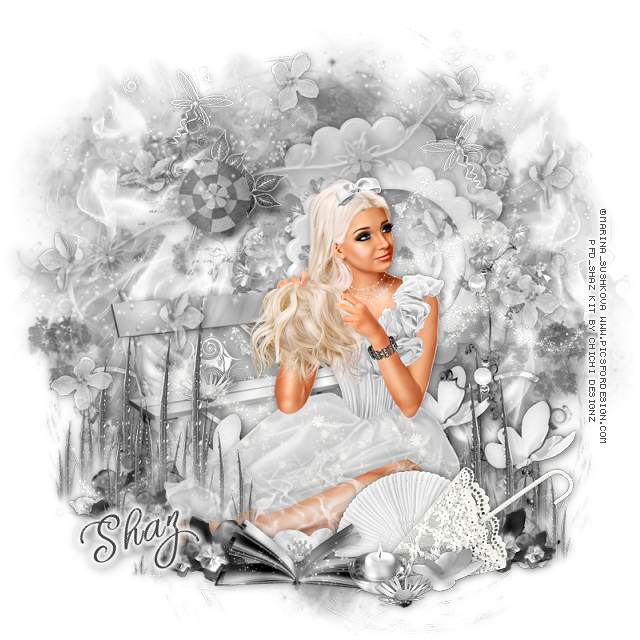
Here is a tag done by Fallingwater aka Lavada, love it thank you.


Saturday, March 13, 2021

FTU Shamrock Cutie


This tut was written March 13th, 2021 for those with a basic knowledge of psp.

I am using the awesome artwork of  Keith Garvey
The tube is called "341-3" 
You need a license to use this tube, do not use without a license.
You can find this tube at CDO store  HERE

I used PSPX...but any of them should work.
FTU kit Shamrocks by TK Designz HERE
Check out the rest of the blog HERE
Lori's PSP Graphics Mask 1159 HERE
Check out the rest of the blog HERE
Filters
Mura Meister Copies-Encircle
xero-Bad Dream 

Font of choice,  I used Jelita

Drop shadow is  V 1 H 5, 50, 15, or use what you prefer.
Let's get started
*Remember to add your drop shadow as you go along*

Open a new image 800 x 800 or a size you prefer, can always resize later.
Paste paper 1, apply your mask, delete, merge group, resize larger to 115%.

Paste element 28 on the right and down, erase the ropes, duplicate, 
flip, move to the upper left.
Resize element 4 to 35%, apply Mura Meister Copies, first number on 24, 
the second and third number on 60, paste above the mask layer.
Resize element 25 to 40%, apply Mura Meister with the same settings,
move below the clover circle.
Resize element 23 to 30%, apply Mura Meister Copies-Encircle, change the 
first number to 22, move to the mask layer.

Resize frame 2 to 75%, paste on the right above the signs, click inside
with your magic wand, expand by 5, paste paper 1, invert, delete, keep selected.
Paste your tube, delete, select none.
Apply the xero filter-Bad Dream, then duplicate the tube, go to Adjust, 
Blur, Gaussian Blur, number on 4, change the blend mode to Overlay.

Resize your tube to 85%, paste on the left above the frame, duplicate, go
to Adjust, Blur Gaussian Blur, number on 4, change the blend mode to Overlay.

Resize element 33 to 90%, paste at the bottom above the tube.
Resize element 41 to 50%, paste at the bottom.
Resize element 43 to 40%, paste behind the bear on the right.
Resize element 26 to 50%, paste behind the cupcake to the right, duplicate, mirror,
move behind the bear to the left.
Resize element 9 to 40%, paste at the lower right below the cupcake.
Resize element 3 to 20%, paste by the hat, duplicate, mirror, move to the upper
left.
Resize element  22 to 30%, paste on the left below the tube, duplicate, mirror.
Resize element 24 to 50%, paste on the right below the leaves, duplicate, 
move up more, duplicate, mirror.

Resize element 7 to 40%, paste at the bottom above the ribbon, duplicate a 
couple more times and move how you like.
Duplicate one, resize smaller to 75%, paste where you like.
Resize element 25 to 35%, paste at the bottom below the ribbon, duplicate,
move above the ribbon.

Resize element 13 to 30%, free rotate to the left at 20 degrees, paste at the bottom
between the flowers.
Resize element 15 to 40%, paste at the bottom above the gem, duplicate,
move to the right below the tube, duplicate once more. flip, move on the green frame
at the top.
Resize element 44 to 40%, paste at the upper left below the clover.
Resize element 5 to 35%, free rotate to the left at 20 degrees, paste on the right.
Paste element 21 behind the tube and down, eraser the dark brown part.

Paste element 27 on the mask layer at the upper right, free rotate to the left at 45 degrees, duplicate, mirror, duplicate, flip, duplicate, mirror.
Paste the sparkles element above the mask at the upper left, duplicate, mirror,
duplicate, flip, duplicate, mirror.
(Optional) 
Paste element 40 below the mask layer at the upper left, duplicate,
mirror, duplicate, flip, duplicate, mirror.

Add any other elements that you would like, make it your own.
Always readjust your mask and elements how you like them before you
 merge your tag, resize, sharpen.

 Then add your copyright and name.
That's it

Hope you enjoyed doing my tut.     

Tuesday, March 9, 2021

FTU White Fantasy


This tut was written March 9th, 2021 for those with a basic knowledge of psp.

I am using the awesome artwork of  Marina Sushkova
The tube is called "Changing the Image" 
You need a license to use this tube, do not use without a license.
You can find this tube at PFD store  HERE

I used PSPX...but any of them should work.
FTU kit White Fantasy by Chichi Designz HERE
Check out the rest of the Blog  HERE
Dragonflypsp Mask 038  HERE
Check out the rest of the blog HERE

Font of choice,  I used Fascinating Celestina

Drop shadow is  V 1 H 2, 40, 15, or use what you prefer.
Let's get started
*Remember to add your drop shadow as you go along*

Open a new image 800 x 800 or a size you prefer, can always resize later,
fill with white.
Paste paper 16, apply your mask, delete, merge group.
Paste the Swirl Sparkles on the mask.
Paste Smoke 1 on the left above the Swirl layer, duplicate, mirror.
Paste the Brush element below the mask on one side, duplicate, mirror,
adjust more before you merge the tag.

Resize the Flower frame to 90%, paste on the right and up a bit.
Resize the Bench to 60%, paste at the lower left.

Resize your tube to 25%, paste at the bottom above the bench.

Paste the Doodle Brush below the frame layer, erase any stem showing below.\, duplicate,
mirror.
Resize Magic Swirl to 90%, paste on the left above the frame layer.

Resize the grass to 90%, paste at the bottom above the tube, erase a little 
in front of the tube, duplicate, resize to 75%, move below the bench layer, duplicate
again and move to the right more.

Resize the book to 40%, paste at the bottom above the tube.
Resize the umbrella to 50%, paste at the bottom to the right below the book.
Resize the fan to 40%, paste below the umbrella layer.
Resize the candle to 20%, paste above the book layer at the bottom.
Resize flower 2 to 15%, paste at the bottom by the candle, duplicate move
to the bench.
Resize Paper flower to 20%, paste below the flower by the candle.

Resize the flower sparkles to 75%, paste on the left, erase the top flower, duplicate,
mirror, move below the tube layer and erase the top flower.
You might have to close this layer off at times as you go along.
Resize flowers to 20%, paste below the book on the lower left, duplicate, mirror,
move behind the tube, duplicate, mirror, move to the right below the umbrella.

Paste smoke above the tube on her legs.
Resize the Pearl Flower to 50%, paste on the lower right below the tall grass, 
duplicate, move behind the tube where you like, duplicate once more,
move to the left behind the tube.
Resize the Pearl Branch to 50%, flip, paste on the right below the Pearl flower.

Resize the Dragonfly to 20%, paste at the upper right, sharpen, duplicate, merge
down, duplicate, mirror, move up on the left.
Paste the Swirl on the last layer behind the mask at the top, duplicate twice, 
move down on each side so a little shows.
Resize Sparkle trail to 50%, paste on the upper right below the tube layer,
duplicate, mirror.

Add any other elements that you would like, make it your own.
Always readjust your mask and elements how you like them before you
 merge your tag, resize, sharpen.

 Then add your copyright and name.
That's it

Hope you enjoyed doing my tut.    

Wednesday, March 3, 2021

FTU Leprechaun Raccoon

This tut was written March 3rd, 2021 for those with a basic knowledge of psp.

I am using the awesome artwork of  Laguna
The tube is called "Leprechaun Racco0n and Coins" 
You need a license to use this tube, do not use without a license.
You can find this tube at PFD store  HERE

I used PSPX...but any of them should work.
FTU kit St Patty's Day 2020 by My Tagging Addiction HERE
Check out the rest of the Blog  HERE
Lori's PSP Graphics Mask 1159  HERE
Check out the rest of the blog HERE

Font of choice,  I used Donkey Stone

Drop shadow is  V 0 H 4, 40, 15, or use what you prefer.
Let's get started
*Remember to add your drop shadow as you go along*

Open a new image 800 x 800 or a size you prefer, can always resize later,
fill with white.
Paste paper 3, apply your mask, delete, merge group, resize larger to 110%.

Paste paper 2, apply the mask, delete, merge group, change the blend mode 
to Soft Light.

Paste Frame 2, click inside with your magic wand, expand by 5,
paste paper 2, invert, delete, change the blend mode to Luminance(l),
move the paper and frame below the Yellow mask and up some.

Resize the Rainbow to 90%, paste in the frame.
Paste the clouds above the yellow mask layer and move up to the top.
Paste the fence above the frame and down.
Paste the grass at the bottom above the fence.

Duplicate the green mask, take your Free Hand Tool and hold the shift key,
drag down one side of the squares and then the other side until flat as  you like, move
above the grass layer.
Resize the coin bucket to 75%, paste on the lower right.

Resize your tube to 28%, paste above the coin bucket.

Paste the mushrooms on the right below the tube, duplicate, mirror, adjust on
the left.
Resize the coins to 25%, paste at the lower right above the tube layer, adjust the mushrooms
behind the coins to hide some of the stems.
Duplicate the coins 2 times, mirror, move one about center above the tube, the other 
one, move below the tube on the left.

Resize the hat to 25%, paste at the bottom above the tube and below the coins.
Resize the horseshoe to 25%, paste on the coins by the hat, duplicate, 
mirror, move to the right by the other coins.
Resize the horseshoe that is more in the center, resize to 90%, move under the 
larger horseshoe.

Paste the butterflies at the upper left being on the top layer, duplicate, 
mirror, move down a little on the right.
Resize clover deco 3 to 25%, paste on the left above the grass layer,  duplicate,
move above the tube and behind the horseshoes and coins, duplicate once 
more, move to the right below the grass layer.
Resize flower 2 to 25%, duplicate 2 more times, move 2 of them below 
the mushroom layers and one above the clover layer in front of the tube.
Resize clover deco 2 to 30%, paste on the right above the fence, duplicate, mirror.

Resize the clover deco to 25%, duplicate, mirror one and paste on each side
on the frame.
Resize deco to 25%, paste behind the hat.
Duplicate the coins by the horseshoes, resize to 75%, mirror, move below 
the flower to the left a bit.

Paste Glitter 2 below the paper layer of the frame on the left, duplicate, mirror.
Duplicate both, flip, adjust so just some of the glitter shows on each corner at the top.

The Avator,  size of choice, mine is 180 x 180, 
just draw out a circle with your Ellipse Tool, width 3,
click inside the circle, expand by 2, paste your tag, invert, delete, select none.
Add noise if you like

Add any other elements that you would like, make it your own.
Always readjust your mask and elements how you like them before you
 merge your tag, resize, sharpen.

 Then add your copyright and name.
That's it

Hope you enjoyed doing my tut.   

Tuesday, March 2, 2021

FTU Wanderer

This tut was written March 2nd, 2021 for those with a basic knowledge of psp.

I am using the awesome artwork of  Yuki
The tube is called "Jane" 
You need a license to use this tube, do not use without a license.
You can find this tube at PFD store  HERE

I used PSPX...but any of them should work.
FTU kit Wanderlust Add-on  HERE
Check out the rest of the Store  HERE
Miz Teeques Mask 284 HERE
Check out the rest of the blog HERE

Font of choice,  I used Aromabar

Drop shadow is  V 0 H 4, 50, 15, or use what you prefer.
Let's get started
*Remember to add your drop shadow as you go along*

This is a quickie....

Open a new image 800 x 800 or a size you prefer, can always resize later,
fill with white.
Select all, add a new layer, paste paper 4 into selection, select none.
Apply your mask, delete, merge group.

Resize the label to 45%, paste.
Go to Effect,  3D Effects, Inner Bevel with these settings
Bevel Shape 2, width 6,
17, 10, 0, 14
352, 28, 64
color white.
Duplicate the label, resize to 60%, move to the center of the first one.
Close off the small one for now, take your free hand tool, draw around the white
part, resize paper 2 to 20%, paste, invert, delete, select none.
Open the small one now.

Resize the suitcase, paste at the bottom.
Resize the wordart Journey to 12%, paste on the small label.
Add a fat gradient glow of choice, I used #ccaf90.
Then a dark brown drop shadow, sharpen once.

Resize your tube to 28%, paste on the left above the suitcase layer.
Resize the moneky by itself to 28%, mirror, paste at the right on the label.

Resize foilage 1 to 20%, paste on the upper left above the mask, duplicate, mirror,
adjust on the right where you like.
Duplicate, flip, move down on the right, duplicate, mirror, adjust behind the
tube on the left.

Resize wordart 1 to 25%, paste above the suitcase.
Resize wordart 3 and 4 to 20%, paste at the top how you like.
Resize brad 1 with the camera on it to 20%, paste at the upper right below 
the monkey.

Resize flower 2 to 10%, paste under the foot of the tube, duplicate, move to the right.
Resize the postcard to 8%,  paste above the suitcase, duplicate, free rotate to the right
 at 25 degrees, paste on the right above the first one.
Resize flower 3 to 10%, paste on the label, duplicate, move over.

Add any other elements that you would like, make it your own.
Always readjust your mask and elements how you like them before you
 merge your tag, resize.

 Then add your copyright and name.
That's it

Hope you enjoyed doing my tut.