Monday, November 29, 2021

PTU Festive Forest


This tut was written November 29th, 2021 for those with a basic knowledge of psp. 

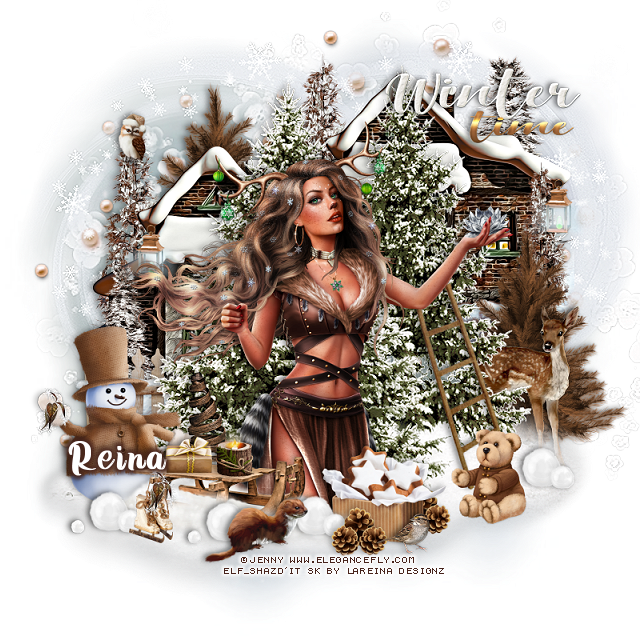
I am using the awesome artwork of Jenny
The tube is "Lillian" 
You need a license to use this tube, do not use without a license.
You can find this tube at Elegancefly store   HERE

I used PSP2020...but any of them should work.
PTU kit Festive Forest by LaReina Designz   HERE HERE HERE HERE
Vivienne's Digital Tagging Mask 0018 HERE
You will have to scroll down a bit
Check out the rest of the Blog HERE

Font of choice, I used Jelita

Drop shadow is V -1 H -4, 50, 10, or use what you prefer.
Let's get started
*Remember to add your drop shadow as you go along*

Open a new image 800 x 800, paste paper 12 into selection, apply your mask, delete, 
merge group.
Resize larger to 115.
Paste element 69 on the mask layer, duplicate, mirror, adjust more later once
all the other elements are placed.

Resize element 3 to 50%, paste at the upper right, duplicate, move to the left and
down some.
Round off the blue edge at the bottom of the houses that you might see after 
applying other elements.
Paste element 89 above the houses and down a little.

Resize your tube to 25%, paste above the trees.

Resize element 90 to 40%, paste on the right below the green trees, duplicate, move
to the left behind the house and down a bit.
Resize element 50 to 40%, paste to the right behind the green trees.
Resize element 2 to 10%, paste on the upper left on the tree.
Resize element 40 to 55%, paste at the bottom above the tube, change the drop
shadow to 25 for the sled.
Resize element 24 to 20%, paste at the bottom above the sled.
Resize element 55 to 30%, paste on the left behind the green trees.

Resize element 5 to 20%, paste behind the sled by the tube.
Resize element 18 to 25%, paste at the bottom above the tube, below the sled.
Resize element 31 to 20%, paste at the bottom behind the box, duplicate, move up and
to the left being on the top layer.
Resize element 16 to 35%, paste on the left above the fence layer.
Resize element 39 to 12%, paste on the sled.
Resize element 11 to 10%, paste one on the snowman hand, duplicate, move to the sled.

Resize element 47 to 15%, paste at the upper right on the house, duplicate, move to
the left on the other house below the tube layer.
Resize element 48 to 15%, paste at the bottom above the box.
Resize element 37 to 35%, paste at the top or where you like.
Resize element 49 to 15%, paste at the lower left on the sled under the small leaf.
Resize element 33 to 20%, paste on the right on the snow.

Resize element 9 to 40%, mirror, free rotate to the left at 15 degrees, move below the 
tube on the right.
Resize element 72 to 15%, duplicate two or three times and place where you like.
Resize element 25 to 10%, paste on the sled by the candle.

Paste element 80 on the mask to one side, duplicate, move to the other side.

Add any other elements that you would like, make it your own.
Always readjust your mask and elements how you like them before you
 merge your tag, resize, sharpen.
Crop your tag to be sure no shadows or lines are on the edges.
 Then add your copyright and name.
That's it

Hope you enjoyed doing my tut.  


Sunday, November 28, 2021

FTU Holiday Magic

This tut was written November 28th, 2021 for those with a basic knowledge of psp. 

I am using the awesome artwork of Marta Sarmiento
The tube is "Merry Christmas 2" 
You need a license to use this tube, do not use without a license.
You can find this tube at DAH store HERE

I used PSP2020...but any of them should work.
FTU kit Sampler 3 by Tiny Turtle Designs   HERE
You will have to register at her store to download the kit.
RD Mask 826 HERE
Check out the rest of the Blog HERE
Filter
Eye Candy 4000-Gradient Glow (Optional)
Mura Meister Copies-Encircle

Font of choice, I used Sunydale

Drop shadow is V -1 H -4, 35, 10, color Black or use what you prefer.
Let's get started
*Remember to add your drop shadow as you go along*

This is a Quickie

Open a new image 800 x 800, paste paper 2, apply your mask, delete, merge group.
Duplicate the mask, merge down.

Take your Eclipse tool, close off the background color on your color palette, use 
a color of choice, I used #f2bf6e, set your width for the circle to 35 or what you
prefer for a size.
Draw out a circle as large as you want, then go to Objects, Align center.

Click inside the circle, expand by 5, paste paper 2, invert, delete, select none.
Go to Effects, 3D Effects, Inner Bevel
Shape 2, width 2, 
6, 4, 3, 25
0, 49, 51
color #adadad
Add a fat white gradient glow using Eye Candy 4000, Gradient Glow. (Optional)
Click inside the circle again, expand by 3, paste your tube inside the frame 3 times,
mirror one tube, arrange how you like, invert and delete each tube.

Resize element 7 to 25%, apply Mura Meister Copies-Encircle, first number on 24,
the next 2 numbers on 53, move below the paper layer of the frame.
Recolor every other flower to #f2bf6e. I just used my Change to Target brush and 
tapped every other flower.

Resize element 30 to 35%, apply Mura Meister Copies-Encircle, first number on 20,
the next 2 numbers on 63, move below the flower circle.
Duplicate the flower circle, resize larger to 108%, paste below the strip circle.

Resize your tube to fit your circle, I resized mine to 75%, paste above the frame.

Resize element 20 to 75%, paste behind the tube how you like.
Resize element 26 to 35%, paste on the right below the string of hearts layer.
Resize element 27 to 20%, paste lower on the other wordart.
Resize element 2 to 50%, paste on the right above the tube.
Resize element 3 to 25%, paste behind the rabbit, duplicate, move over a bit, 
duplicate one and resize to 75%, move to the left of the tube.

Resize element 22 to 25%, paste behind the other gifts to the right a little.
Paste element 9 on the frame layer, adjust how you like, duplicate, mirror, flip, move 
above the wordart sign and down some.

Resize element 1 and 32 to 15%, paste on the right by the other wordart how you like.
Resize element 5 to 15%, paste at the bottom above the rabbit.
Resize element 12 to 35%, paste behind the tube by the feet.
Resize element 14 to 25%, duplicate, paste both behind the present on the left.
Duplicate the present and move behind the buttons.

Add any other elements that you would like, make it your own.
Always readjust your mask and elements how you like them before you
 merge your tag, resize, sharpen.
Crop your tag to be sure no shadows or lines are on the edges.
 Then add your copyright and name.
That's it

Hope you enjoyed doing my tut.  


PTU A Yorkie Christmas


This tut was written November 28th, 2021 for those with a basic knowledge of psp. 

I am using the awesome artwork of Laguna
The tube is "Christmas Deer Yorkie" 
You need a license to use this tube, do not use without a license.
You can find this tube at PFD store HERE

I used PSP2020...but any of them should work.
FTU kit Sampler 3 by Doodles by Design  HERE
This sampler kit is now 50 cents no longer as FTU
You will have to register at her store to download the kit.
DD Mask 2019Xmask1 HERE
Check out the rest of the Blog HERE
Filter 
Mura Meister Copies-Encircle
Font of choice, I used AR Hermann

Drop shadow is V -1 H -4, 40, 10, color Black or use what you prefer.
Let's get started
*Remember to add your drop shadow as you go along*

Open a new image 800 x 800, paste paper 2, apply your mask, delete, merge group.
Change the blend mode to Multiply.

Resize the frame to 90%, paste, click inside with your magic wand, expand by 5,
paste paper 4, invert, delete, select none.
Paste element 3 on the frame, duplicate, change the blend mode to Multiply.

Resize element 11 to 75%, duplicate, change the blend mode to Multiply, duplicate 
once more and merge these 3 together.
Apply Mura Meister Copies-Encircle, first number on 20, the next two numbers
on 47, move below the paper layer of the frame.

Resize your tube to 33%, paste, being on the top layer.

(On the Multiplying, when you duplicate, duplicate as many times as you 
like to get the darkness you want.)

Resize element 11 to 60%, paste at the lower right, duplicate, change the blend mode
to Multiply, duplicate again, merge these 3 layers together, duplicate, mirror.

Resize element 8 to 50%, paste above the green branches, duplicate, change the 
blend mode to Multiply, duplicate 2 more times and merge these 4 layers together.
Duplicate, resize to 90%, move to the left below the green branch, duplicate, mirror.

Paste element 12 at the bottom below all the other elements, duplicate, change the 
blend mode to Multiply, duplicate 3 more times, merge these 5 layers together.

Resize element 1 to 25%, duplicate, change the blend mode to Multiply, duplicate
once more and merge these 3 layers together, past below the branch off center.
Duplicate, free rotate to the left at 15 degrees, move to the left.
Resize element 4 to 35%, duplicate, change the blend mode to Multiply, duplicate,
merge these 3 layers together, move below the poinsettia on the left.

Resize element 5 to 25%, duplicate, change the blend mode to Multiply, duplicate,
merge these 3 layers together, move below the poinsettia on the right, duplicate, 
mirror, move behind the teddy bear, duplicate, free rotate to the right at 90,
move below the branches to the left and up a little.

Resize element 9 to 45%, duplicate, change the blend mode to Multiply, duplicate
once more, merge these 3 layers down., paste below the top poinsettia and down a little.

Resize the wordart to 25%, duplicate, change the blend mode to Multiply, merge down.
Free rotate to the right at 15 degrees, paste at the lower right above the pinecone.
Go back to one of the hearts, duplicate, resize to 50%, move below the wordart,
duplicate, move to the left below the bear.

Add any other elements that you would like, make it your own.
Always readjust your mask and elements how you like them before you
 merge your tag, resize, sharpen.

Crop your tag to be sure no shadows or lines are on the edges.
 Then add your copyright and name.
That's it

Hope you enjoyed doing my tut.  


Saturday, November 27, 2021

Exclusive ATP Christmas


This tut was written November 27th, 2021 for those with a basic knowledge of psp. 

I am using the awesome artwork of Anna Liwanag
The tube is "131-2" 
You need a license to use this tube, do not use without a license.
You can find this tube at CDO store   HERE

I used PSP2020...but any of them should work.
Exclusive ATP Christmas by Designz by Shelly HERE
You can earn this kit at ATP by earning Gems.
RD Mask 827 HERE
Check out the rest of the Blog HERE
Filter
xero-Bad Dream
Mura Meister Copies-Encircle

Font of choice, I used Reindeer Christmas

Drop shadow is V -1 H -4, 40, 10, color Black or use what you prefer.
Let's get started
*Remember to add your drop shadow as you go along*

Open a new image 800 x 800, paste paper 32, apply your mask, delete, merge group.
Duplicate, mirror. adjust when finished with your tag.

Resize frame 3 to 75%, paste, flip, mirror.
Click inside the frame, expand by 5, paste paper 17 or one of choice, invert, delete,
keep selected.
Paste your tube, delete, select none.
(Optional) Apply the xero filter-Bad Dream to the tube.

Resize Christmas holly 1 to 30%, free rotate to the right at 90 degrees,
apply Mura Meister Copies-Encircle, first number on 26, the second two numbers 
on 48, move below the paper layer of the frame.
Paste wreath 4 below that circle, resize to 92%.
Paste wreath 1 below that wreath, resize to 95%, flip, erase the bow showing at 
the bottom.

Resize flower 2 to 5o%, paste on the frame on the left, duplicate, mirror.
Resize the Christmas Holly 1 to 50%, paste at the lower left below the flower, 
duplicate, mirror.
Resize the Christmas Holly 2 to 50%, paste below the first holly on the left, duplicate, 
mirror. move both down just a bit.
Resize candle 4 to 60%, being on the top layer paste center at the bottom.

Resize your tube to 40%, paste below the candle layer and then move the flower
vine below the tube.
Again (Optional) Apply the filter xero-Bad Dream to the tube.

Resize Candy Cane with Holly 3 to 35%, paste on the left below the candles,
duplicate, mirror, move down more on the right.
Resize the Christmas Rocking Bear to 25%, paste at the lower left being on the top layer.

Resize the Decorated Branch 2 to 30%, paste at the bottom below the other elements,
having the ornaments showing, duplicate, mirror.
Resize elf 2 to 25%, mirror, paste at the lower right being on the top layer.
Resize Christmas presents 2 to 40%, paste on the left above the frame, duplicate,
mirror, adjust behind the tube.

Resize sparkle 6 to 25%, paste on the first circle under the frame where you like, 
duplicate a couple of times or so and move around.

If you want to do an Avatar 
Open a new image 180 x 180, take the elements you want to use before you merge
your tag.
Resize around 70 to 75%, paste how you like, merge.

Add any other elements that you would like, make it your own.
Always readjust your mask and elements how you like them before you
 merge your tag, resize, sharpen.
Crop your tag to be sure no shadows or lines are on the edges.
 Then add your copyright and name.
That's it

Hope you enjoyed doing my tut.  

FTU Decorating Time


This tut was written November 27th, 2021 for those with a basic knowledge of psp. 

I am using the awesome artwork of Stella Felice 7
The tube is "Susan" 
You need a license to use this tube, do not use without a license.
You can find this tube at PFD store   HERE

I used PSP2020...but any of them should work.
FTU kit Sampler 2 by Tiny Turtle Designs   HERE
You will have to register at her store to download the kit.
Vivienne's Digital Tagging Mask 18 HERE
You will need to scroll down a bit
Check out the rest of the Blog HERE
Filter
xero-Bad Dream

Font of choice, I used Glamour Line

Drop shadow is V -1 H -4, 40, 10, color Black or use what you prefer.
Let's get started
*Remember to add your drop shadow as you go along*

Open a new image 800 x 800, paste paper 5, apply your mask, delete, merge group.
Then paste paper 3, apply the mask, delete, merge group, merge down.

Paste element 26 to the left.
Resize element 4 to 70%, free rotate to 90 degrees, paste on the right below 
the tree layer .
Duplicate the frame, change the blend mode to Multiply, merge down.
Click inside with your magic wand, expand by 5, paste paper 5, invert, delete, 
select none, keep selected.
Resize your tube to 55%, mirror, paste below the frame, delete, select none.
Apply the xero filter-Bad Dream

Resize your tube to 48%, paste above the tree and frame layers.

Resize element 21 to 40%, paste at the lower right.
Rotate element 10 to 25%, to the left, paste above the mask layer at the bottom.
Resize element 29 to 50%, paste on the left above the tree.
Resize element 23 to 30%, paste above the sled.
Resize element 9 to 25%, paste behind the tube on the left, duplicate, move over and
down a little.

Resize element 17 to 35%, paste at the lower left above the tube.
Resize element 25 to 18%, paste above the horse.
Resize element 18 to 18%, paste by the snow globe.
Resize element 27 to 20%, paste by the cup.

Resize element 16 to 30%, free rotate to the right at 45 degrees, paste at the lower
right above the tube.
Resize element 24 to 15%, paste on top of the lantern.
Resize element 11 to 25%, take your free hand draw around the ornament, duplicate 
a few times and place on the tree where you like.
Resize element 7 to 15%, paste on the tree at the top.

Resize element 22 to 20%, paste on the handle of the lantern below the bow.
Resize element 20 to 30%, paste at the bottom by the ornaments.
Resize element 13 to 20%, paste on the left behind the horse.

Resize element 6 to 25%, free rotate to the left at 20 degrees, paste below the 
ornaments and cup.
Resize element 19 to 15%, paste on the frame at the top, duplicate, resize to 85%, move
over a bit.

Add any other elements that you would like, make it your own.
Always readjust your mask and elements how you like them before you
 merge your tag, resize, sharpen.
Crop your tag to be sure no shadows or lines are on the edges.
 Then add your copyright and name.
That's it

Hope you enjoyed doing my tut.  


Friday, November 26, 2021

PTU Winter Blues


This tut was written November 26th, 2021 for those with a basic knowledge of psp. 

I am using the awesome artwork of Sunny Rose
The tube is "Mary" 
You need a license to use this tube, do not use without a license.
You can find this tube at PFD store   HERE

I used PSP2020...but any of them should work.
PTU kit Winter Blues by LaReina Designz   HERE HERE HERE HERE
Vivienne's Digital Tagging Mask 0018 HERE
You will have to scroll down a bit
Check out the rest of the Blog HERE

Font of choice, I used Glamour Line

Drop shadow is V -1 H -4, 40, 10, or use what you prefer.
I used a Dark Blue for the drop shadow instead of black on this.
Let's get started
*Remember to add your drop shadow as you go along*

Open a new image 800 x 800, paste paper 6, apply your mask, delete, merge group.
Resize larger to 115.
Paste paper 2, apply your mask, delete, merge group, resize large to 105%, 
merge down.

Resize element 55 to 90%, paste on the upper right.
Flip element 35, paste above the house and to the right a bit.
Resize element 73 to 90%, paste on the left above the branch.
Paste element 77 at the top above the house, duplicate, move to the bottom.
Paste element 25 on the mask layer and move up some so a little of the top shows. 

Resize element 19 to 80%, paste at the lower right, duplicate, mirror, move down a 
bit more.

Resize tube to 28%, paste between the logs.

Resize element 9 to 20%, paste on the right on the log.
Resize element 26 to 40%, paste at the lower left above the log.
Resize element 15 to 35%, paste the front paws on the sled.

Resize element 20 to 20%, paste below the log on the right behind the tube.
Resize element 22 and 23 to 12%, paste at the lower right above the tube layer.
Resize element 59 to 40%, paste at the upper left below the cloud behind the tree.
Resize element 72 to 50%, paste on the left below the log behind the fox, duplicate, 
mirror, adjust behind the squirrel.

Resize element 57 to 20%, paste at the bottom being on the top layer.
Resize element 28 to 30%, paste at the bottom in front of the tube.
Resize element 69 to 15%, paste at the lower right by the pinecones.
Resize element 41 to 15%, paste behind the tall Christmas tree.
Paste element 84 at the top how you like.

Paste element 60 below the lantern at the bottom.
Resize element 1 to 20%, paste on the right below the pinecones, duplicate,
resize smaller to 75%, move by the lantern.
Resize element 78 to 20%, paste at the bottom by the lantern, duplicate, mirror,
adjust above the fox.

Resize element 80 to 85%, free rotate to the right at 25 degrees, move below the 
tube and paste on the tree, duplicate, mirror.

Add any other elements that you would like, make it your own.
Always readjust your mask and elements how you like them before you
 merge your tag, resize, sharpen.
Crop your tag to be sure no shadows or lines are on the edges.
 Then add your copyright and name.
That's it

Hope you enjoyed doing my tut.