Showing posts with label SNCO. Show all posts

Friday, June 24, 2022

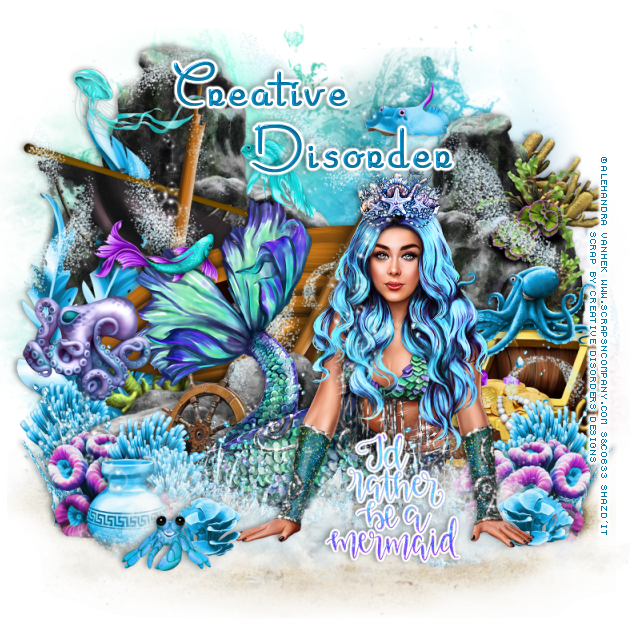
PTU Mermaid Splash


 This tut was written June 24th, 2022 for those with a basic knowledge of psp. 

I am using the awesome artwork of Alehandra Vanhek
Tube is called Magic Mermaid
You need a license to use this tube, do not use without a license.
You can find this tube at SNCO HERE

I used PSP2020...but any of them should work.
PTU matching kit Mermaid Splash by Creative Disorder  HERE
Awesome kit with 125 elements and 14 papers
Check out her blog HERE
Mask of choice, I used RD Mask 116-4 HERE
Check out the rest of the blog HERE

Font of choice, I used Marguerita-20JW

Drop shadow is V -1 H -4, 40, 10, or use what you prefer.
Let's get started
*Remember to add your drop shadow as you go along*

Open a new image 800 x 800, select all, add a new layer, paste paper 1 into selections, 
apply your mask,  delete, merge group.

Resize element f10(3) to 70%, mirror, paste on the left.
Resize element 25 to 75%, paste on the right.
Resize element pdc_MFMEle23 to 50%, paste on the left and up.

Resize your tube to 35%, paste at the bottom being on the top layer.

Resize element 16 to 75%, paste at the bottom below the tube.
Paste element Cdd_cu_eLEMENTS (837) at the bottom below the tube and rocks.
Resize element Cdd_cu_eLEMENTS (141) to 35%, paste on the rocks on
the right behind the tube.
Resize element HD_IKHDesignsCUOceanFriendsCU20 to 25%, paste 
on the chest lid on the right.

Resize element 110 to 50%, paste at the bottom left above the tube, duplicate, mirror.
Duplicate the tube, move above the water, erase the parts over the water,
except for the hands.
Resize element HD_IKHD_Unicorn_CU14 to 75%, paste at the bottom below the 
tube.
Resize element pdc_MFMEle18 to 25%, paste on the left below the white cloudy layer,
duplicate, mirror.
Resize element Cdd_cu_eLEMENTS (267) to 20%, paste on the left.

Resize element Bonus tube 01 to 20%, mirror. paste on the left.
Resize BC-Summer Volume 18 (8)to 25%, paste at the lower left below the rock, duplicate,
move above the vase, duplicate again, mirror.

Resize element HD_IKHD_MagicalSeaCU15 to 20%, mirror, paste on the left.
Resize element HD_IKHD_MagicalSeaCU01 to 15%, mirror, paste on the left and up.
Resize element HD_IKHDesignsCUOceanFriendsCU12 to 15%, mirror, paste 
at the upper right below the rocks.
Resize element HD_IKHD_MagicalSeaCU29 to 20%, paste at the upper left.

Resize element yHD_IKHD_DeepInTheSeaCU34 to 50%, paste on the upper left
below the tube layer, duplicate, mirror, move down a little.
Resize f10(4) to 30%, paste below the tube to the lower left.

Resize element BC-CUSummerVol_18 (13) to 75%, paste on the left above the black rock.
Paste element yHD_IKHD_MagicalSeaCU28 where you like, erase some off the
bottom.
Resize wordart to 25%, add a fat white gradient glow, paste at the bottom.
Resize element 14 to 20%, paste at the lower left, duplicate, mirror, move
below the hand on the right.
Resize element HD_MermaidDreamsCU34 to 20%, paste at the lower left by 
the flower.

Add any other elements that you would like, make it your own.
Always readjust your mask and elements how you like them before you
 merge your tag, resize, sharpen.

Crop your tag to be sure no shadows or lines are on the edges.
 Then add your copyright and name.
That's it

Hope you enjoyed doing my tut.    

Tuesday, December 17, 2019

PTU Santa's Candy Cane


This tut was written Dec 17th, 2019, for those with a basic knowledge of psp.
I am using the awesome tube by artist LysIsange
Tube is called "Santas Candy Cane"
She comes in different colors to choose from.
 You need a license to use this art, please do not use without a license.
Please do not use without a license.
You can find this tube at SNCO store HERE

I used PSPX...but any of them should work.
PTU kit Santas Candy Cane by LMB at SNCO HERE
Mask of choice, I used Trese Mask 0035  HERE
Check out the rest of the blog HERE

Font of choice,  I used Heartbeat in Christmas

Drop shadow is usually V-2 H-2 Black, 50, 5, use what you prefer.
Let's get started
*Remember to add your drop shadow as you go along*

Open a new image 800 x 800
Paste paper 3, apply your mask, delete, merge group.

Resize element 70 to 95%, paste on the mask layer.

Take your magic wand, click inside each window frame, expand by 5,
paste paper 11, invert, delete, keep selected.
Resize your tube to 75%, paste, delete, select none.
Go to Effects, Texture Effects, Blinds with these settings
and apply to your tube.
5, 25, color on white, both boxes checked.

Resize element 27 to 90%, paste on the frame at the upper left, duplicate,
mirror, move below the paper layer of the frame.

Resize your tube to 35%, paste on the left on the frame.
Paste element 93 at the bottom above the tube layer.

Resize element 87 to 65%, paste at the lower right below the greenery.
Resize element 31 to 30%, mirror, paste on the frame at the upper right.
Resize element 1 and 2 to 15%, paste at the bottom below the greenery on 
the left.

Resize element 90 to 35%, paste below the cookies on the left, duplicate,
mirror, move to the right below the tube layer.
Resize element 24 to 10%, and element 92 to 15%, paste both at the bottom 
above the greenery.
Go back to one of the cookies, duplicate, move below the ornaments.
Resize element 28 to 20%, paste at the upper left.

Resize element 38 to 20%, paste on the greenery center, duplicate twice,
move each to one side.
Resize element 52 to 15%, paste at the bottom above the greenery.
Resize element 88 to 20%, paste below the flowers on the greenery, 
duplicate a couple of times and move over more on each one.

Resize element 55 to 25%, paste below the train.
Resize element 89 to 50%, paste at the bottom below all the elements, duplicate,
mirror.
Paste element 66 being on the top layer.

Add any other elements you would like, make it your own.
Always remember to adjust the elements before merging to get them like you like.

Once happy with your tag, close off any background, crop your tag to make
sure there are no stray edges, merge visible, resize first.
Add your copyrights and name.

That's it
Hope you enjoyed doing my tut.

Saturday, November 23, 2019

PTU Christmas Charlene


This tut was written Nov 23rd, 2019, for those with a basic knowledge of psp.
I am using the awesome tube by artist LysIsange
Tube is called "Christmas Charlene"
 You need a license to use this art, please do not use without a license.
Please do not use without a license.
You can find this tube at SNCO store HERE

I used PSPX...but any of them should work.
PTU kit Alexia by LMB Exclusive  HERE 
WSL Mask_535  HERE
Filter
Mura Meister Copies-Encircle

Font of choice,  I used Pretty Girl Script

Drop shadow is usually V-2 H-2 Black, 50, 5, use what you prefer.
Let's get started
*Remember to add your drop shadow as you go along*

Open a new image 800 x 800
Paste paper 1, apply your mask, delete, merge group.

Paste element 97, click inside with your magic wand, expand by 10,
paste paper 10, invert, delete, select none.

Resize element 74 to 40%, apply Mura Meister Copies-Encircle, first number
on 20, move below the paper layer of the wreath.
On the resize element 74, flip and apply the Mura Meister Copies again, move
this layer on the mask layer.

Resize your tube to 45%, paste at the bottom and to the right a little.

Resize element 21 to 75%, paste at the bottom above the tube to
the right.
Resize element 23, 24 and 25 to 25%, paste below the tube at the bottom.
Resize element 74 to 30%, paste on the bow on the wreath.
Resize element 40 to 30%, paste inside the wreath.

Resize element 39 to 30%, paste in the wreath behind the deer.
Resize element 50 to 40%, paste inside the wreath behind the deer and santa.

Paste element 16 below the tube layer.
Resize element 89 to 40%, paste at the bottom above the gifts.
Resize element 82 to 30%, paste at the bottom above the train.
Resize element 33 to 50%, paste above the wreath on the left.

Resize element 41 to 90%, paste behind the tube on the right.
Paste element 20 on the wreath.

Add any other elements you would like, make it your own.
Always remember to adjust the elements before merging to get them like you like.

Once happy with your tag, close off any background, crop your tag to make
sure there are no stray edges, merge visible, resize first.
Add your copyrights and name.

That's it
Hope you enjoyed doing my tut.

Thursday, November 21, 2019

FTU Thanksgiving Time


This tut was written Nov 21st, 2019 for those with a basic knowledge of psp.
I am using the awesome artwork of  Alehandra Vanhek
The tube is called "Mrs. Pilgrim "
You need a license to use this tube, do not use without a license.
You can find this tube at SNCO store  HERE

I used PSPX...but any of them should work.
FTU kit Lovely Autumn by GoF Designs  HERE
Miz Teeques Mask_194  HERE
Check out the rest of the blog HERE

Font of choice,  I used Basically Yes

Drop shadow is usually V-2 H-2 Black, 50, 5, use what you prefer.
Let's get started
*Remember to add your drop shadow as you go along*

Open a new image 800 x 800 or a size you prefer.
Select all, add a new layer, paste paper 9 into selection, select none,
apply your mask, delete, merge group.

Paste element 43 on the mask layer.
Paste frame 1, click inside with your magic wand, expand by 5,
paste paper 7, invert, delete, select none.

Paste element 20 on the frame.
Resize your tube to 40%, paste a little to the right.

Paste element 5 below the tube on the right.
Resize element 37 to 30%, paste at the lower right above the tube.

Resize element 38 to 40%, paste at the bottom above the pumpkin.
Resize element 36 to 35%, paste on the frame on the left, duplicate,
mirror, move behind the wagon on the right.
Duplicate again, resize to 50%, paste below the pumpkin in front of the tube.

Resize element 24 to 60%, paste at the lower left above the tube.
Resize element 42 to 50%, paste behind the tube on the left.
Resize element 18 to 50%, paste behind the wagon, duplicate, mirror.
Resize element 16 to 15%, paste at the bottom below the large mushroom,
duplicate, mirror, move to the left below the mushroom.

Resize element 45 to 30%, paste between the pumpkins, duplicate, mirror,
move above the pumpkins.
Resize element 34 to 30%, paste above the pumpkin layer, duplicate, 
mirror, move to the left behind the big mushroom, duplicate once more, mirror,
move below the wagon on the right.

Paste element 17 at the bottom below the leaves wreath on the left,
duplicate, mirror, duplicate, move to the top, duplicate, mirror, erase the long
piece that is stick out.
Resize element 39 to 15%, paste at the left below the flower,
duplicate move below the large mushroom, duplicate again, move to 
the right below the pumpkin, free rotate to the right at 90 degrees.

Resize element 40 to 25%, paste on the frame at the upper right below the tube,
duplicate, move down on the pumpkin.
Resize element 19 to 30%, flip, paste behind the large mushroom,
duplicate, move to the upper right below the frame.
Resize element 29 to 25%, mirror, paste on the tree at the upper left.
Resize element 41 to 15%, paste at the bottom to the left, duplicate,
mirror, adjust on the right.

Resize element 19 to 15%, flip paste at the bottom by the pumpkin,
duplicate, mirror, move by the large mushroom.
Add any wordart that you would like.
I provided the one I made to use if you would like to use that one.

Add any other elements that you would like, make it your own.
Always readjust your mask and elements how you like them before you
 merge your tag.
Crop your tag to make sure no shadows or anything on the edges, merge visible.
 Then add your copyright and name.

That's it
Hope you enjoyed doing my tut.