
Showing posts with label Mythical Designs. Show all posts

Tuesday, February 21, 2023

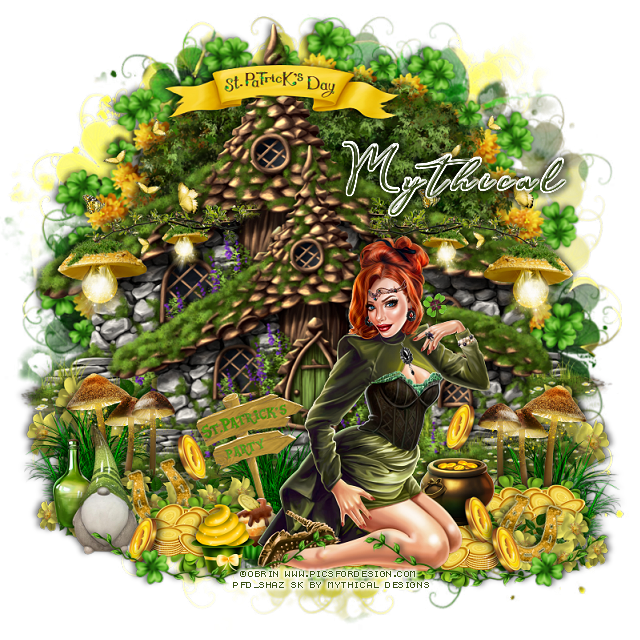
PTU Lucky Charm


This tut was written February 21st, 2023 for those with a basic knowledge of psp. 

I am using the awesome artwork of ©Obrin
Tube is Adena
You need a license to use this tube, do not use without a license.
You can find this tube at PFD Store HERE

I used PSP2020...but any of them should work.
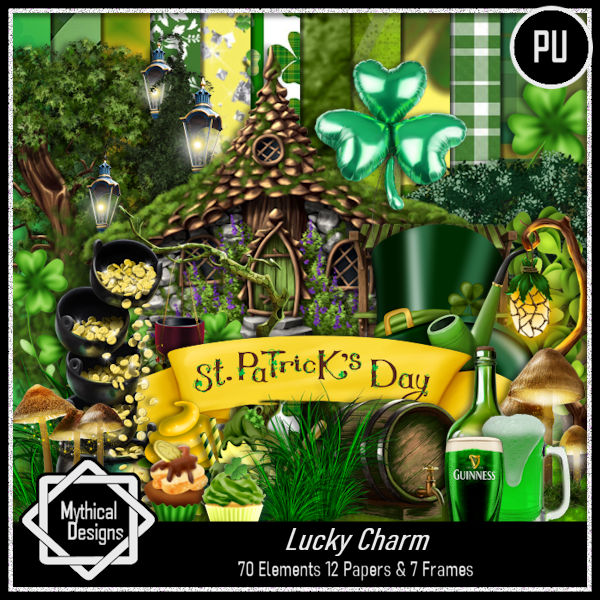
PTU Lucky Charm by Mythical Designs   HERE  HERE
Mask of Choice, I used RD Mask 737 HERE
Check out the rest of the blog HERE

Font of choice, I used Beautiful Kisses

Drop shadow is V -1 H -4, 50, 10, Black or use what you prefer.
Let's get started
*Remember to add your drop shadow as you go along*

Open a new image 800 x 800, select all, new layer, paste paper 9 into selection,
apply your mask.
Duplicate, change the blend mode to Hard Light, merge down.

Resize frame 5 to 70%, paste.
Resize element 8 to 85%, paste at the top above the frame.
Resize element 5 to 95%, paste, move up and a little to the left, duplicate, 
resize smaller to 85%, move down a little and to the right.
Resize element 69 to75%, paste between the cottages at the bottom of the
one in back, on the left, duplicate, mirror.

Resize your tube to 12%, paste at the bottom being on the top layer.

Resize element 41 to 30%, paste at the bottom right below the tube, duplicate, 
move a little more to the left, duplicate again, mirror, move by the tube to the left.
Resize element 69 to 50%, paste at the bottom left below the gold coins, duplicate,
mirror, place between the coins on the right.

Resize element 28 to 30%, paste at the left below the flowers, duplicate, mirror.
Resize element 33 to 30%, paste on the left behind the mushrooms, duplicate, mirror,
duplicate, move back by the tube.

Resize element 48 to 20%, paste at the bottom above the tube.
Resize element 52 to 20%, paste at the bottom behind the first cupcake.
Resize element 70 to 30%, free rotate to the left at 15, paste at the bottom behind 
the cupcake.
Resize element 37 to 35%, paste at the upper right, duplicate, mirror.
Resize element 29 to 50%, paste on one side of the cottage that is in the back,
duplicate, mirror.
Resize element 1 to 25%, duplicate 3 more times, paste where you like, mirror 
a couple of them.
Resize element 11 to 30%, paste on the left at the bottom.
Resize element 66 to 20%, paste by the gnome.
Resize element 57 to 25%, free rotate to the right at 20, paste at the lower right 
below the coins, duplicate, mirror, move below the coins by the gnome.
Resize element 63 to 50%, paste on the cottage roof.
Resize element 55 to 50%, paste at the bottom above the tube to the left, duplicate,
mirror.

Add any other elements you would like, make it your own.
Crop your tag to be sure no shadows or lines are on the edges.
 Then add your copyright and name.
That's it

Hope you enjoyed doing my tut.   

Monday, October 3, 2022

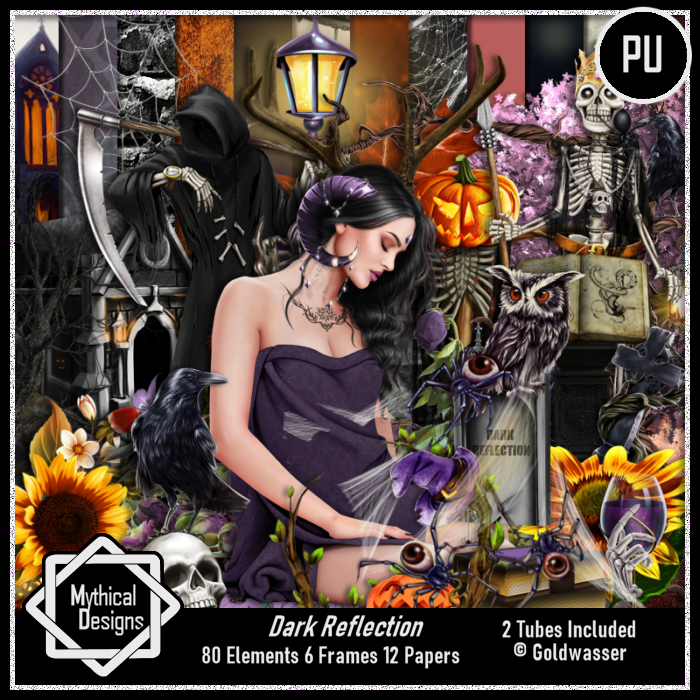
CT Tags Dark Reflection by Mythical Designs

  CT Tags for Wicked Mythical Designs
Awesome kit, it contains 80 elements, 6 frames & 12 papers
2 tubes by ©Goldwasser are included with this kit
This kit is ready for all your Halloween, Spooky, Gothic tagging fun
You can find this kit HERE  HERE


Thursday, September 15, 2022

PTU HallowWitch


This tut was written September 15th, 2022 for those with a basic knowledge of psp. 

I am using the awesome artwork of ©Misticheskaya
Tube is Witch_Laurie
You need a license to use this tube, do not use without a license.
You can find this tube at PFD store HERE

I used PSP2020...but any of them should work.
PTU kit HallowWitch by Mythical Designs  
Beautiful kit, it contains 80 Autumn elements, 6 Frames & 12 Papers.
Check out her blog HERE
Mask of choice, I used Miz Teeques mask 354 HERE
Check out the rest of the blog HERE

Font of choice, I used October Twilight

Drop shadow is V -1 H -4, 50, 10, or use what you prefer.
Let's get started
*Remember to add your drop shadow as you go along*

Open a new image 800 x 800, paste paper 8, apply your mask, delete, merge group,
resize larger to 115%.

Resize frame 2 to 85%, paste, click inside with the magic wand, expand by 2,
add a new layer, resize paper 9 to 70%, paste into selection, move below the
frame.
Duplicate the frame, resize to 90%.

Paste element 9 on the frame on the left, duplicate, mirror, move between the
frames, erase the part inside the frame.

Resize element 34 to 70%, paste to the right below the tree layer.
Resize element 29 to 40%, paste on the right above the frame, duplicate, mirror.
Resize element 47 to 65%, paste above the pumpkins at the bottom.
Resize element 8 to 40%, paste at the lower left below the flowers.
Resize element 43 to 40%, paste below the pumpkins on the right, duplicate, mirror.

Resize your tube to 30%, paste below the tree, duplicate, move above the tree, 
erase the part to uncover the crow and some of the tree at the lower left.
Move the scarecrow below the tube.

Resize elements 28, 39, 40 and 41 to 25%, paste at the bottom being on the 
top layer, arranging them how you like.
Resize element 10 to 50%, paste on the right above the pumpkins.
Resize element 44 to 25%, paste at the lower left above the tombstone.
Resize element 53 to 75%, paste inside the frame below the scarecrow.

Resize element 30 to 40%, paste on the left below the tree, duplicate, mirror,
move below the tree on the right and down.
Resize element 20 to 15%, paste at the lower right above the bottles.
Resize element 35 to 30%, paste above the tube by the leg.

Add any other elements that you would like, make it your own.
Always readjust your mask and elements how you like them before you
 merge your tag, resize, sharpen.

Crop your tag to be sure no shadows or lines are on the edges.
 Then add your copyright and name.
That's it

Hope you enjoyed doing my tut.    

Saturday, September 3, 2022

PTU Shades of Autumn


 This tut was written September 2nd, 2022 for those with a basic knowledge of psp. 

I am using the awesome artwork of ©Ellie_Milk
Tube is Autumn Girl with Leaf
You need a license to use this tube, do not use without a license.
You can find this tube at PFD store HERE

I used PSP2020...but any of them should work.
PTU kit Shades of Autumn by Mythical Designs  
Beautiful kit, it contains 80 Autumn elements, 5 Frames & 12 Papers.
Check out her blog HERE
Mask of choice, I used DD Autumn Fall Mask 5 HERE
Check out the rest of the blog HERE

Font of choice, I used Autumn Days

Drop shadow is V -1 H -4, 50, 10, or use what you prefer.
Let's get started
*Remember to add your drop shadow as you go along*

Open a new image 800 x 800, paste paper 7, apply your mask, delete, merge group.
Duplicate, move down to the bottom.

Resize frame 2 to 65%, paste, duplicate, free rotate the bottom frame
to the left at 15 degrees, click inside with the magic wand, expand by 5, paste 
paper 1, invert, delete, select none.
Resize element 15 to 95%, paste inside the frame.
Resize element 20 to 50%, paste behind the flower in the frame.

Resize element 67 to 75%, paste above the masks.

Resize your tube to 35%, paste on the frame on the right.

Paste element 8 on the mask layer at the top.
Paste element 42 on the left above the tree, duplicate, mirror.
Resize element 1 to 75%, paste on the left above the frames.
Resize element 73 to 60%, paste at the lower left above the tube layer.

Resize element 71 to 40%, paste at the bottom being on the top layer.
Resize element 33 to 30%, paste above the tube to the right behind the fall sign.
Resize element 76 to 25%, paste at the bottom above the sign to the left, 
duplicate three more times, move one to the right behind the sign, the other one behind the 
sign to the left of the squirrel, mirror the third one and move back by the 
second one.

Resize element 6 to 50%, paste on the right above the frame, duplicate, move 
down more, duplicate both, mirror, adjust on the left.
Resize element 17 to 20%, paste at the lower left by the basket.
Resize element 57 to 20%, paste at the lower left.
Resize element 26 to 40%, paste on the lower right above the frame so just a little
shows, duplicate, mirror.
Resize element 22 and 23 to 15%, paste at the bottom above the sign.

Add any other elements that you would like, make it your own.
Always readjust your mask and elements how you like them before you
 merge your tag, resize, sharpen.

Crop your tag to be sure no shadows or lines are on the edges.
 Then add your copyright and name.
That's it

Hope you enjoyed doing my tut.    

Friday, August 19, 2022

PTU Autumn Magic


 This tut was written August 19th, 2022 for those with a basic knowledge of psp. 

I am using the awesome artwork of ©Eenniizze
Tube is Raquel
Tube is NOT included in the kit
You need a license to use this tube, do not use without a license.
You can find this tube at EleganceFly store HERE

I used PSP2020...but any of them should work.
PTU kit Autumn Magic by Mythical Designs  HERE  
Beautiful kit with 80 elements, 12 papers, and 5 frames 
Check out her blog HERE
Mask of choice, I used RD Mask 683 HERE
Check out the rest of the blog HERE

Font of choice, I used Aunofa Serif

Drop shadow is V -1 H -4, 50, 10, or use what you prefer.
Let's get started
*Remember to add your drop shadow as you go along*

Open a new image 800 x 800, paste paper 10, apply your mask, delete, 
merge group, erase a little at the top left and lower left.

Resize element 63 to 65%, paste on the upper right, click inside with the magic
wand, expand by 5, paste paper 2, move so the yellow is center, invert, delete,
keep selected.
Resize your tube to 65%, paste, delete, select none. Duplicate the tube, go to 
Adjust, Blur, Gaussian blur, number on 5, change the blend mode to Lighten, merge 
down.

Resize your tube to 25%, paste above the frame to the left.

Paste element 70 on the mask layer on the upper left.
Paste element 53 above the tree at the upper left, duplicate, move down on the 
lower right.
Resize elements 68 and 72 to 40%, paste at the bottom above the tube.

Resize element 7 to 50%, paste at the upper left below the flowers.
Paste element 27 on the right behind the tube and down.
Resize element 30 to 35%, paste on the stump.
Resize element 38 to 30%, mirror, paste at the lower right above the stump.

Resize element 22 to 45%, paste at the bottom below the leaf with the seeds.
Resize element 11 to 30%, paste at the bottom above the book.
Resize element 74 to 30%, paste behind the book.
Resize element 33 to 75%, paste at the bottom below the tube layer.
Resize element 73 to 50%, paste on the left below the tube by the dragon's leg.

Resize element 77 to 20%, paste on the right below the mushrooms and leaf 
with seeds.
Resize element 71 to 25%, paste at the bottom left being on the top layer.
Resize element 37 to 25%, paste at the lower right below the bird cage.
Paste element 60 below the tube on the left, duplicate, move to the right and down.
Resize element 55 to 50%, paste at the upper left being on the top layer now.

Add any other elements that you would like, make it your own.
Always readjust your mask and elements how you like them before you
 merge your tag, resize, sharpen.

Crop your tag to be sure no shadows or lines are on the edges.
 Then add your copyright and name.
That's it

Hope you enjoyed doing my tut.    
Wednesday, August 17, 2022

PTU Fae Forest


 This tut was written August 17th, 2022 for those with a basic knowledge of psp. 

I am using the awesome artwork of ©Verymany
Tube is Forest Fairy
You need a license to use this tube, do not use without a license.
You can find this tube at Verymany store HERE

I used PSP2020...but any of them should work.
PTU kit Fae Forest by Mythical Designs  HERE HERE HERE
Beautiful kit with 80 elements, 12 papers, and 7 frames 
Check out her blog HERE
Mask of choice, I used Vivienne's Digital Tagging Mask 46 HERE
Check out the rest of the blog HERE

Font of choice, I used Arsinoe

Drop shadow is V -1 H -4, 50, 10, or use what you prefer.
Let's get started
*Remember to add your drop shadow as you go along*

Open a new image 800 x 800, paste paper 7, apply your mask, delete, 
merge group.

Paste element 54 and move to the top, duplicate, resize to 50%, move down on 
the left, duplicate, mirror.
Resize element 22 to 50%, paste at the top on the greenery to one side, 
duplicate, mirror.

Paste element 66 above the lights.
Resize element 19 to 40%, paste below the house on one side, duplicate, mirror.
Resize element 24 to 50%, paste at the bottom of the house.
Resize element 28 to 30%, paste on one side of the water pond, duplicate, mirror.
Resize element 3 to 30%, paste above the greenery on one side, duplicate, mirror.
Duplicate the greenery that is behind the mushroom, move above the mushroom and
down more, duplicate, mirror.

Resize element 50 to 30%, paste below the greenery on one side, duplicate, mirror,
duplicate two more times, move toward the center more.

Resize your tube to 35%, paste below some of the greenery.

Resize element 58 to 35%, paste at the bottom being on the top layer.
Resize element 10 to 35%, paste below the pixie jars, duplicate, move over.
Paste element 74 on the left behind the tube layer.
Resize element 7 to 35%, mirror, paste on the mushrooms on the right.
Paste element 32 below the house on the left, duplicate, mirror.
Resize element 78 to 20%, paste at the bottom below the pixie jars on the right,
duplicate, mirror. 
Duplicate twice and move one to each side.

Add any other elements that you would like, make it your own.
Always readjust your mask and elements how you like them before you
 merge your tag, resize, sharpen.

Crop your tag to be sure no shadows or lines are on the edges.
 Then add your copyright and name.
That's it

Hope you enjoyed doing my tut.    

Thursday, August 4, 2022

PTU Spider Witch


 This tut was written August 3rd, 2022 for those with a basic knowledge of psp. 

I am using the awesome artwork of ©Sheokate
Tubes are included with this kit
You need a license to use this tube, do not use without a license.

I used PSP2020...but any of them should work.
PTU kit Spider Witch by Mythical Designs HERE HERE HERE HERE
Beautiful kit with 70 elements, 12 papers, and 6 frames + tubes by Sheokate 
Check out her blog HERE
Mask of choice, I used RD 756  HERE
Check out the rest of the blog HERE

Font of choice, I used Paulistana

Drop shadow is V -2 H -5, 50, 10, or use what you prefer.
Let's get started
*Remember to add your drop shadow as you go along*

Open a new image 800 x 800, paste paper 1, apply your mask, delete, merge group.
Paste paper 6, apply the mask, delete, merge group, merge papers together.

Resize element 66 to 80%, paste and move up, change the blend mode to
Luminance(L).
Resize element 21 to 95%, paste at the bottom above the house.
Resize element 47 to 75%, paste on one side, duplicate, mirror.
Resize element 13 and 15 to 50%, paste on the right below the house layer,
duplicate both, mirror, adjust on the left.

Paste element 44 at the bottom above the fence to one side, duplicate, mirror.
Resize element 59 to 60%, paste on the left, duplicate, mirror.

Resize your tube to 18%, paste center being on the top layer.

Paste element 33 below the house on the left, change the blend mode to Darken,
duplicate, mirror.
Resize element 4 to 20%, paste on the right below the tube layer, duplicate, mirror.
Resize element 27 to 35%, paste on the fence on the right.
Resize element 20 to 20%, paste at the lower left.

Resize element 19 to 25%, paste on the lower right.
Resize element 48 and 56 to 25%, paste at the lower left below the frog.
Duplicate element 48, free rotate to the left at 90 degrees, move how you like.
Paste element 46 at the upper left, duplicate, mirror, erase the ones you don't want.

Resize element 41 to 85%, paste on the mask at the upper left, duplicate, 
move to the right and down some.
Resize element 64 to 50%, paste on the right above the headstones, change the blend
mode to Overlay.

Add any other elements that you would like, make it your own.
Always readjust your mask and elements how you like them before you
 merge your tag, resize, sharpen.

Crop your tag to be sure no shadows or lines are on the edges.
 Then add your copyright and name.
That's it

Hope you enjoyed doing my tut.