

This tut was written May 4th, 2020 for those with a basic knowledge of psp.
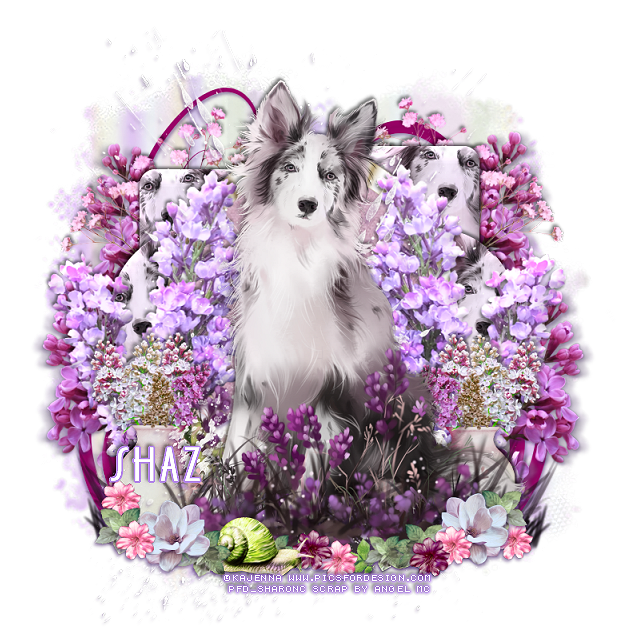
I am using the awesome artwork of Kajenna
The tube is called "Lavender Morning"
You need a license to use this tube, do not use without a license.
You can find this tube at PFD store HERE
I used PSPX...but any of them should work.
Font of choice, I used DK Soerabaja
Drop shadow is usually V-2 H-2 Black, 50, 5, use what you prefer.
Let's get started
*Remember to add your drop shadow as you go along*
Open the template, hold the shift key and hit d to duplicate, close
the original.
Delete the wordart and credits, go to Image, Canvas size, 800 x 800
or a size you prefer.
Resize paper 4 to 55%, paste below the template layers, apply your mask,
delete, merge group.
Select layer 1, select all, float, defloat, resize paper 9 to 22%, paste,
keep selected, resize your tube to 40%, mirror, paste, delete, select none,
delete the template layer.
Select layer 2 of the template, do the same with each layer, select, float, defloat,
resize paper 9, paste, invert, delete, paste your resized tube, delete, select none.
Do the same with layers 5 and 6 as you did with layers 1 and 2.
Merge layer 4 down with layer 3, select all, float, defloat, resize paper 8,
to 30%, paste, invert, delete, select none, delete the template too.
Merge each of the tubes down with the paper and apply a bevel with
these settings.
Go to Effects, 3D Effects
Bevel shape 2
width 25
10, 3, 5, 24
336, 50, 30
color #f1e7f7 or color of choice
Layer 7, select all, float, defloat, resize paper 1 to 50%, paste, invert
delete, select none.
Resize element 180 to 18%, paste on the circle, take you Pick tool to fit better.
Resize your tube to 40%, paste on the top layer.
Resize element 150 to 75%, paste on the mask on the right, duplicate, mirror.
Resize element 9 to 95%, paste on the right behind the tube, duplicate, mirror,
adjust so more of the tube shows thru on the small circles.
Apply the same bevel settings as before.
Resize element 8 to 35%, paste below the tube on the left, duplicate, mirror.
Resize element 195 to 50%, paste below the tube layer.
Resize element 47 to 15%, paste at the lower left being on the top layer,
duplicate, mirror.
Resize element 14 to 15%, paste under the flower on one side, duplicate,
mirror, duplicate, both flip, move behind the flowers.
Resize element 183 to 10%, paste at the bottom left below the leaf layer.
Resize element 23 to 50%, paste on the mask layer at the upper left,
duplicate, mirror, duplicate both, move down, erase any stem showing
at the bottom.
Go back to the original tube, copy the flowers, resize to 40%, paste
behind the vase on the right, duplicate, mirror, adjust everything to
how you like it.
Resize element 40 to 10%, paste at the lower left being on the top layer,
duplicate, mirror, duplicate a couple more times and place where you like.
Resize element 39 to 10%, duplicate once or twice, paste where you like.
Resize element 111 to 5%, paste at the bottom below the other leaves, duplicate,
mirror.
Resize element 192 to 15%, paste at the bottom on the mask layer on
the left, duplicate, mirror, duplicate move to the top.
Do not merge if you are going to do a Signature and Avator tags.
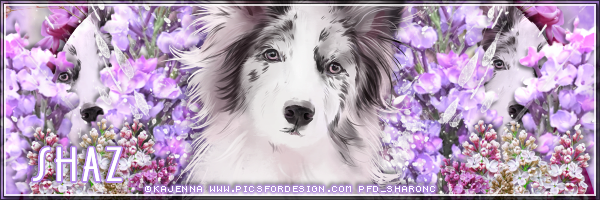
If you want to do a Signature tag
Open 600 x 200 or size of choice, fill with #b589e8.
Close off your tube on your tag, copy and paste.
Open you original tube, resize to 50%, paste.
Copy the white splatter from your tag, paste behind the tube on one side,
duplicate, mirror.
Add a frame of choice.
I like using AAAFrame-Foto frame, width 3
Add your copyright and name.
Avator
Size of choice, mine is 180 x 180
Close the tube on your tag, copy merge, paste, adjust how you like.
Go back, open the tube, copy and paste to the side more, merge visible.
Add copyright and name.
Frame of choice.
Add any other elements that you would like, make it your own.
the original.
Delete the wordart and credits, go to Image, Canvas size, 800 x 800
or a size you prefer.
Resize paper 4 to 55%, paste below the template layers, apply your mask,
delete, merge group.
Select layer 1, select all, float, defloat, resize paper 9 to 22%, paste,
keep selected, resize your tube to 40%, mirror, paste, delete, select none,
delete the template layer.
Select layer 2 of the template, do the same with each layer, select, float, defloat,
resize paper 9, paste, invert, delete, paste your resized tube, delete, select none.
Do the same with layers 5 and 6 as you did with layers 1 and 2.
Merge layer 4 down with layer 3, select all, float, defloat, resize paper 8,
to 30%, paste, invert, delete, select none, delete the template too.
Merge each of the tubes down with the paper and apply a bevel with
these settings.
Go to Effects, 3D Effects
Bevel shape 2
width 25
10, 3, 5, 24
336, 50, 30
color #f1e7f7 or color of choice
Layer 7, select all, float, defloat, resize paper 1 to 50%, paste, invert
delete, select none.
Resize element 180 to 18%, paste on the circle, take you Pick tool to fit better.
Resize your tube to 40%, paste on the top layer.
Resize element 150 to 75%, paste on the mask on the right, duplicate, mirror.
Resize element 9 to 95%, paste on the right behind the tube, duplicate, mirror,
adjust so more of the tube shows thru on the small circles.
Apply the same bevel settings as before.
Resize element 8 to 35%, paste below the tube on the left, duplicate, mirror.
Resize element 195 to 50%, paste below the tube layer.
Resize element 47 to 15%, paste at the lower left being on the top layer,
duplicate, mirror.
Resize element 14 to 15%, paste under the flower on one side, duplicate,
mirror, duplicate, both flip, move behind the flowers.
Resize element 183 to 10%, paste at the bottom left below the leaf layer.
Resize element 23 to 50%, paste on the mask layer at the upper left,
duplicate, mirror, duplicate both, move down, erase any stem showing
at the bottom.
Go back to the original tube, copy the flowers, resize to 40%, paste
behind the vase on the right, duplicate, mirror, adjust everything to
how you like it.
Resize element 40 to 10%, paste at the lower left being on the top layer,
duplicate, mirror, duplicate a couple more times and place where you like.
Resize element 39 to 10%, duplicate once or twice, paste where you like.
Resize element 111 to 5%, paste at the bottom below the other leaves, duplicate,
mirror.
Resize element 192 to 15%, paste at the bottom on the mask layer on
the left, duplicate, mirror, duplicate move to the top.
Do not merge if you are going to do a Signature and Avator tags.
If you want to do a Signature tag
Open 600 x 200 or size of choice, fill with #b589e8.
Close off your tube on your tag, copy and paste.
Open you original tube, resize to 50%, paste.
Copy the white splatter from your tag, paste behind the tube on one side,
duplicate, mirror.
Add a frame of choice.
I like using AAAFrame-Foto frame, width 3
Add your copyright and name.
Avator
Size of choice, mine is 180 x 180
Close the tube on your tag, copy merge, paste, adjust how you like.
Go back, open the tube, copy and paste to the side more, merge visible.
Add copyright and name.
Frame of choice.
Add any other elements that you would like, make it your own.
Always readjust your mask and elements how you like them before you
merge your tag, sharpen once.
Crop your tag to make sure no shadows or anything on the edges, merge visible.
Crop your tag to make sure no shadows or anything on the edges, merge visible.
Then add your copyright and name.
That's it
Hope you enjoyed doing my tut.
Absolutely love this Tut with this dog, but I am not finding the link or the kit by this person, Fruit Mixed Summer by Angel MC.
ReplyDeleteBy the way who is Angel MC or am I missing something could this be a nickname?
Thanks so much for any info on any of this.
hugs...shirley
Looks like she has removed her blog, so the kit is no longer available...I am not sure who it is or was...Not sure I have the kit anymore either, will look thru my folders and see...if not then you will have to use another kit...sorry..this is 3 years old, so sometimes they just close their blogs and stop doing kits anymore..but I will check..ty :)
ReplyDeleteI can't find the kit so I must have deleted it or lost it when I had to get a new computer, you can use another kit that has purple flowers in it and that should work.. :)
ReplyDeleteThanks so much for trying, that's what I will do.
ReplyDeleteHugs..shirley