
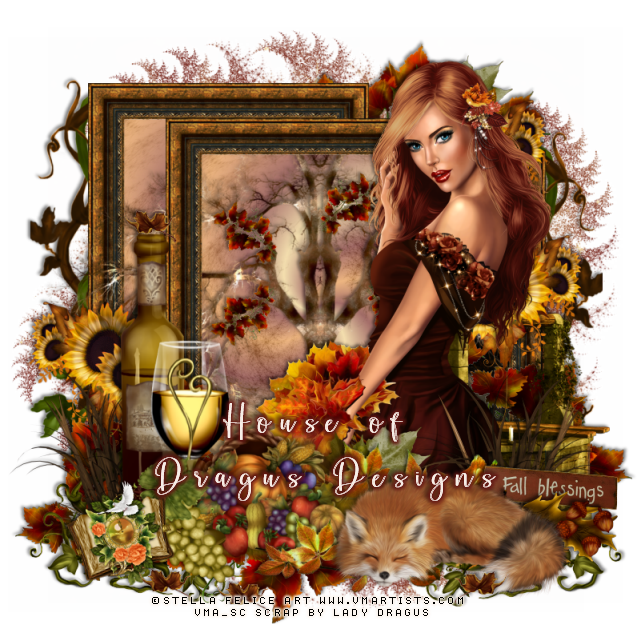
This tut was written Sept 17th, 2019 for those with a basic knowledge of psp.
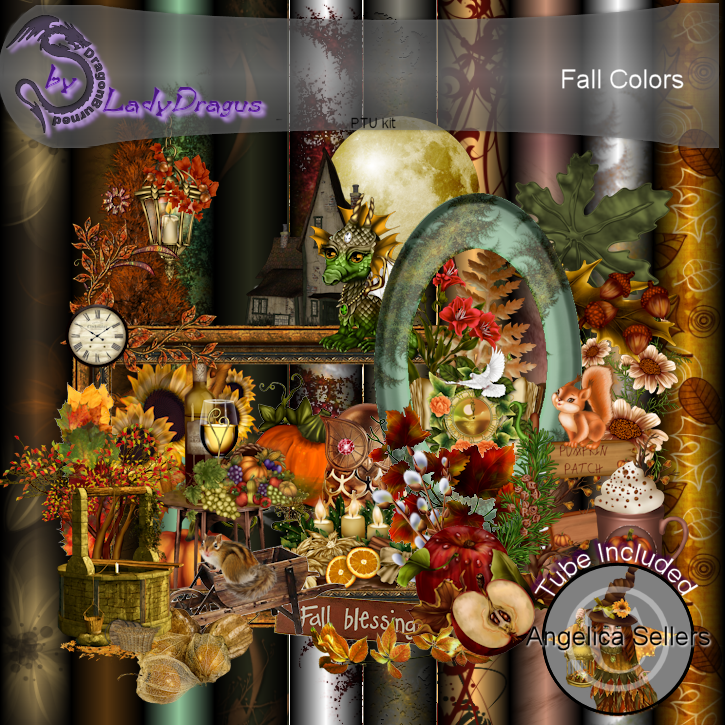
I am using the awesome kit "Fall Colors" by Lady Dragus
I am using the awesome artists ©Stella Felice Art
This kit is exclusive at ADU
You can find this kit at ADU Store HERE
You can find the matching Clusters to the kit HERE
The tube is called Autumnal Bunch
You can find the tube at VMArtists HERE
I used PSPX...but any of them should work.
Mask of choice I used the masks included in the kit 50-8
Font of choice, I used Belly Betty
Drop shadow is usually V-2 H-2 Black, 50, 5, use what you prefer.
Let's get started
*Remember to add your drop shadow as you go along*
Open a new image 800 x 800
Paste paper 50-(3), apply your mask twice, delete, merge group, resize to 90%,
duplicate the mask, free rotate to the right at 90 degrees, merge down,
change the blend mode to multiply.
Resize element EF-(1) to 80%, free rotate to the right, duplicate twice, move
on to the left and up behind the first frame, duplicate, move to the right and down.
Click inside the top frame with your magic wand, expand by 5, paste paper 50-(4),
invert, delete, select none.
Resize element 1 to 55%, paste in the top frame.
Resize your tube to 22%, paste on the right on the top frame.
Resize element 28 to 40%, paste at the lower left, duplicate, mirror.
Resize element 42 to 75%, paste on the left above the grass.
Resize EF-(3) to 75%, paste on the mask on the right, duplicate, mirror, erase the
part behind the head of the tube.
Resize element 46 to 50%, paste at the bottom right above the tube.
Resize element 61 to 55%, paste on the right below the grass.
Paste element 27 so it shows in both the back frames, erase any part outside the frame.
Resize element 5 to 40%, paste below the wine bottle on the left, duplicate,
mirror, move below the well. All you want showing is the vines.
Resize element 2 to 40%, paste at the bottom below the wine bottle and grass,
duplicate, move to toward the center, duplicate, again and move to the right
below the well, duplicate, flip, free rotate to the left at 45 degrees, move at the
top above the mask layer.
Resize element 20 to 25%, paste at the bottom below the fox on the right.
Resize element 60 to 25%, paste at the lower left being on the top layer, free rotate
to the left at 15 degrees.
Resize element 37 to 30%, paste at the lower right below the acorn leaf.
Resize element 38 to 25%, paste above the tube, duplicate, move to the upper right
behind the tube's head below the frames.
Resize element 11 to 40%, mirror, paste at the bottom under the fox, duplicate,
move below the wine bottle layer behind the fox.
Resize element 45 to 30%, paste on the left behind the wine bottle and up a little,
duplicate, mirror, adjust on the handle of the well behind the tube, duplicate again,
move up behind the tube's head and let just a little show.
Resize element 59 to 10%, paste at the bottom, duplicate a couple of more times,
move how you like and move one on top of the wine bottle.
Add any other elements you would like, make it your own.
Always remember to adjust the elements before merging to get them like you like.
Once happy with your tag, close off any background, crop your tag to make
sure there are no stray edges, merge visible, resize first.
Add your copyrights and name.
That's it
That's it
Hope you enjoyed doing my tut.
No comments:
Post a Comment