
This tut was written August 22, 2020 for those with a basic knowlewdge of psp.
I am using the awesome artwork of Fiodoroa Maria
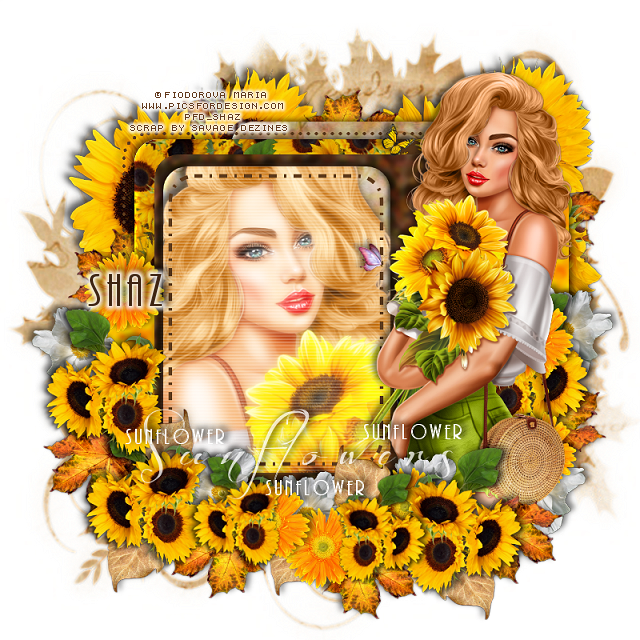
The tube is called "Diana and sunflowers"
You need a license to use this tube, do not use without a license.
You can find this tube at PFD store HERE
I used PSPX...but any of them should work.
Font of choice, I used Before the Rain, AR Bonnie
Drop shadow is V-3 H-5 Black, 50, 10, use what you prefer.
Let's get started
*Remember to add your drop shadow as you go along*
Open the template, duplicate, close the original, delete the credits.
Go to Image, Canvas size, 800 x 800, can alway resize later.
Resize the paper to 22%, paste above the white background, apply your mask,
delete, merge group.
Duplicate, change the blend mode to multiply, merge down.
Select layer 1, select all, float, defloat, resize the paper to 22%, paste, invert,
delete, select none.
Duplicate, change the blend mode to multiply, merge down, delete the
template layer.
Apply the Medhi filter-Grain Natural 2.0, default settings.
Then go to Effects, 3 D Effects, Inner Bevel with these settings
Shape 2, Width 5
25, 2, 4, 0
270, 52, 25
or play around and get what you like.
Color white
Layer 8 the dotted line, change to a color of choice.
Select layer 2, float, defloat, new layer, fill with #5f3c1d, keep selected,
resize element 7 to 25%, paste, apply the Mura Meister Filter-wallpaper- rotate.
number on 23, select none, merge down, apply the same bevel settings as before.
Merge layer 4 down with layer 3, select all, float, defloat, add a new layer,
fill with #fab300.
Apple the Medhi filter, Grains Natural 2.0 same settings.
Same bevel settings.
Select layer 5, float, defloat, add a new layer fill with #5f3c1d, apply the Medhi filter,
same settings.
Select layer 6, float, defloat, resize the paper to 22%, paste, invert, delete,
keep selected.
Resize your tube to 50%, mirror, paste, apply the bevel setting to the paper.
Apply the Medhi filter to the paper.
Duplicate your tube, Go to Adjust, Blur, Gaussian Blur, number on 4,
change the blend mode to Screen, merge down.
Go to Effects, Blinds, with these settings
4, 25, both boxes checked.
Be sure to watch the edges for any shadows showing, erase if they do.
Layer 7, dotted lines, change to a color of choice.
Resize the tube to 30%, paste on the right.
Resize element 7 to 60%, paste above the mask at the upper left, duplicate,
mirror, move up more on the right.
Duplicate, bring to the top layer, flip, resize smaller to 45%, paste
above the tube at the lower left, duplicate, mirror, cover the bottom of the legs.
Duplicate again, resize to 75%, move over some, duplicate, mirror.
Resize element 8 to 20%, paste below the sunflowers on the right, duplicate,
mirror, move up a bit, duplicate again, move to the center more, duplicate, mirror.
Duplicate as many times as you like and move around.
Resize element 1 to 15%, paste at the bottom where you like, duplicate, mirror,
duplicate a couple more times, flip and move where you like.
Go back to the larger sunflowers at the bottom, duplicate both and move up
on the left and up and behind the tube on the right.
Resize element 6 and 9 to 15%, paste on the right below the tube layer how
you like, duplicate each and move to the left.
Duplicate both and move to the bottom more to the center, duplicate once more
on each and move.
Add some wordart if you like.
I typed out Sunflowers using font Before the Rain
Then I used AR Bonnie for the smaller Sunflower words, duplicate,
move how you prefer.
Add any other elements that you would like, make it your own.
Always readjust your mask and elements how you like them before you
merge your tag, sharpen once.
Crop your tag to make sure no shadows or anything on the edges
Crop your tag to make sure no shadows or anything on the edges
Then add your copyright and name.
That's it
Hope you enjoyed doing my tut.
No comments:
Post a Comment