

This tut was written Jan 9th, 2019, for those with a basic knowledge of psp.
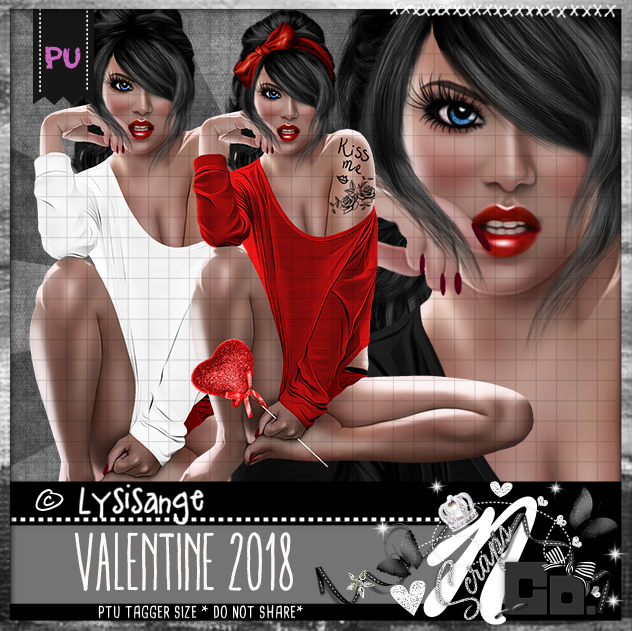
I am using the awesome tube by artist LysIsange
Tube is called "VALENTINE_ 2018"
She comes in 3 different colors.
You need a license to use this art, please do not use without a license.
You can get this tube Exclusive at S&CO HERE
Drop shadow is usually V-2 H-2 Black, 50, 5, use what you prefer.
Let's get started
*Remember to add your drop shadow as you go along*
Open a new image 800 x 800
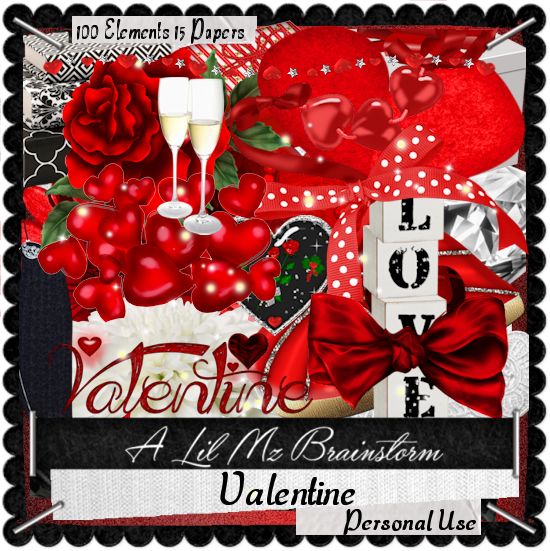
Paste paper 10, apply your mask, delete, merge group, duplicate, mirror, erase
the part that is coving the hearts on each side.
Resize your tube to 40%, paste a little to the right.
Free rotate element 82 to the left at 90 degrees, paste on the left and below
the tube layer. Select all, float, defloat, expand by 2, add a new layer, fill with white,
move below the red wordart and out just a little, merge down, add your drop shadow.
Resize element 51 to 55%, paste at the lower left above the tube.
Resize element 39 to 35%, paste at the lower left under the lipstick.
Resize element 44 to 30%, paste at the bottom above the tube.
Resize element 22 to 45%, paste behind the tube on the right.
Resize element 87 to 60%, paste on the table.
Resize element 84 to 25%, paste at the bottom below the glasses.
Paste element 43 on the mask layer.
Resize element 66 to 40%, paste at the bottom above the necklace.
Resize element 93 to 30%, paste at the bottom above the glasses with the left bow
on the glass stem.
Resize element 89 to 30%, paste at the lower right behind the box.
Resize element 96 to 15%, free rotate to the right at 35 degrees, paste on the table.
Resize element 22 to 25%, paste at the bottom to the left below the necklace, adjust
behind the bottle.
Resize element 58 to 60%, mirror, paste at the lower right being on the top layer.
Paste element 75 on the mask, move about center, erase any parts showing on the lower
right that you don't want, duplicate, mirror, move down on the lower left so
just a few hearts shows, erase more if needed, then duplicate again, mirror, adjust
so a few show past the hat, erase again any you don't want.
Resize element 86 to 20%, paste at the bottom by the hat, duplicate, move to the left,
below the lipstick, duplicate again, resize to 75%, paste on the table by the
lightbulb.
Resize element 13 to 40%, paste below the hat on the right, duplicate, move to
the left so just a little of the box shows.
below the lipstick, duplicate again, resize to 75%, paste on the table by the
lightbulb.
Resize element 13 to 40%, paste below the hat on the right, duplicate, move to
the left so just a little of the box shows.
Add any other elements you would like, make it your own.
Always remember to adjust the elements before merging to get them like you like.
Once happy with your tag, close off any background, crop your tag to make
sure there are no stray edges, merge visible, resize first.
Add your copyrights and name.
That's it
That's it
Hope you enjoyed doing my tut.
No comments:
Post a Comment