
This tut was written November 22nd, 2020 for those with a basic knowledge of psp.
I am using the awesome artwork of Verymany
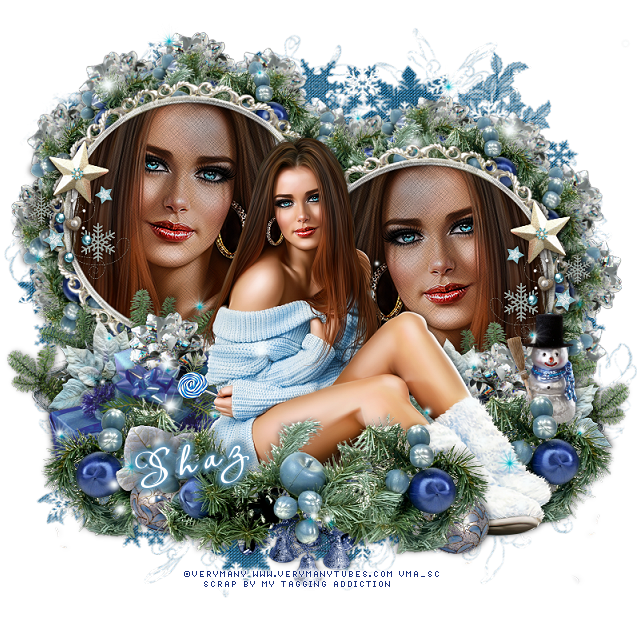
The tube is called "Blue Lollipop"
You need a license to use this tube, do not use without a license.
You can find this tube at Verymany store HERE
Font of choice, I used Aquarelle
Drop shadow is V-0 H-5 Black, 50, 10, use what you prefer.
Let's get started
*Remember to add your drop shadow as you go along*
Open a new image 800 x 800 or a size you prefer.
I always fill with white and delete the white layer at the end.
Paste paper 2, resize your mask to 85%, paste, delete, merge group.
Resize frame 1 to 65%, paste, click inside with your magic wand, expand by 5,
paste paper of choice, I used #3, invert, delete, keep selected,
Mirror your tube, paste in the frame, delete, select none.
Change the blend mode on the tube to Multiply.
Merge the frame, tube and paper together, duplicate, mirror, move down
on the right more.
Resize element 25 to 35%, apply Mura Meister Copies-Encircle,
first number on 12, change the X and Y to 35, paste below the paper layer of
the frame, duplicate, move to the other frame.
Resize element 40 to 40%, apply the same setting Mura Meister Copies,
move below the first circle so the ribbons shows.
Resize your tube to 50%, paste above the frames and arrange the frames
behind the tube how you like.
Resize element 25 to 50%, paste at the bottom above the tube, duplicate, move
below the tube and to the right, duplicate, mirror.
Resize element 40 to 40%, paste on the left below the branches, duplicate, mirror.
Resize element 39 to 40%, paste on the left above the other gift.
Resize element 16 to 45%, paste on the right above the frame layer, duplicate,
mirror.
Paste element 55 above the tube to the left, erase the parts you don't,
duplicate, mirror, erase again any parts you don't want.
Duplicate a couple more times, move below the frame on each side, adjust.
Resize element 10 to 25%, paste at the bottom below the branches.
Resize element 7 to 25%, paste below the branches on the lower left, duplicate,
move to the right by the foot of the tube.
Resize element 44 to 20%, paste on top of the ornament that is on the left.
Resize element 2 to 25%, paste on the left below the gifts, duplicate, mirror,
move to the right a bit, duplicate again and move more to the right.
Resize element 15 to 50%, erase all but the snowman, paste on the right below
the branches.
Resize element 41 to 25%, paste on the frame on one side, duplicate, mirror.
Add any other elements that you would like, make it your own.
Always readjust your mask and elements how you like them before you
merge your tag, sharpen once.
Crop your tag to make sure no shadows or anything on the edges
Crop your tag to make sure no shadows or anything on the edges
Then add your copyright and name.
That's it
Hope you enjoyed doing my tut.
No comments:
Post a Comment