

This tut was written May 4th, 2023 for those with a basic knowledge of psp.
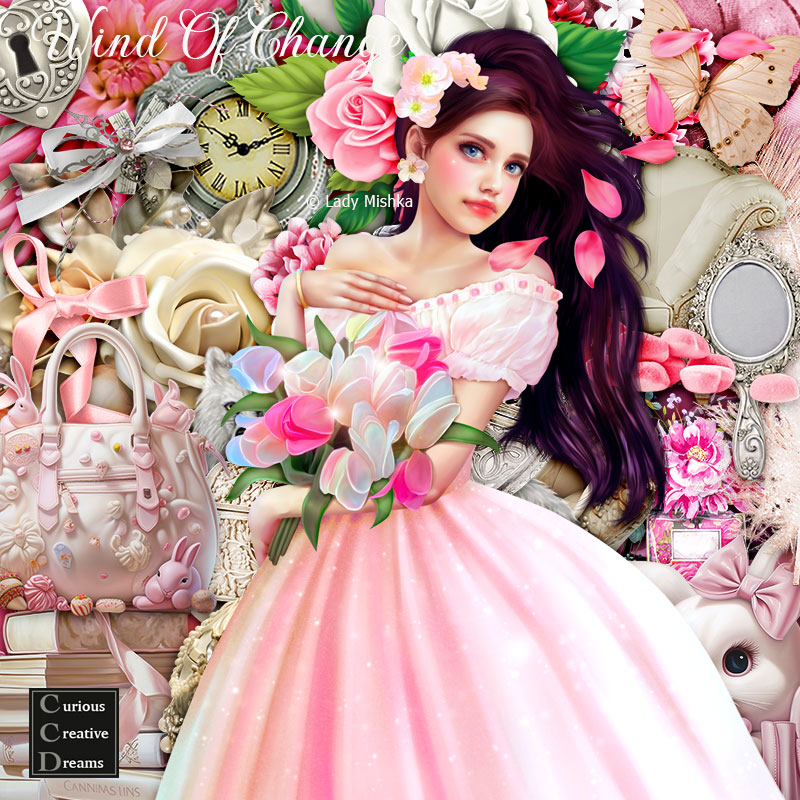
I am using the awesome tube by ©Lady Mishka
The tube is called Wind of Change
You need a license to use this tube, please do not use without a license.
You can find the tube at VMA store HERE
I used PSP2020...but any of them should work.
Drop shadow as you go is V -1 H -3, 40, 10, or use what you prefer.
Let's get started
*Remember to add your drop shadow as you go along*
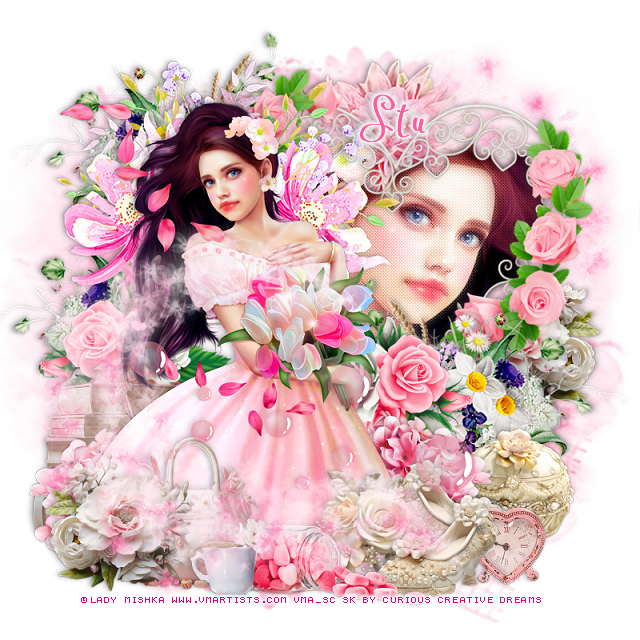
Open a new image 800 x 800, paste paper 20, apply your mask, delete,
merge group, mirror.
Resize element 14 to 85%, paste at the upper right
Resize your tube to 90%, paste below the frame, click inside with the magic wand,
expand by 3, invert, delete, then paste paper 12 below the tube,
delete, select none.
Duplicate the tube, go to Adjust, Blur, Gaussian blur, number on 5, change
the blend mode to Screen or one you like, apply Scree Works-Light Gauze,
merge down.
Paste element 66 at the top behind the frame.
Resize your tube to 40%, mirror, paste on the left above the frame.
Paste element 68 behind the tube at the top.
Resize element 18 to 50%, free rotate to the left at 90, paste behind the
tube on the right, duplicate, mirror, adjust to cover the bottle part of the
other flowers.
Resize element 57 to 60%, paste on the upper left behind the flowers,
duplicate, move down on the left, duplicate, move above the frame on the right.
Resize element 5 to 30%, paste behind the tube at the lower left.
Resize element 105 to 35%, paste behind the tube on the right, duplicate, move to the
left above the books.
Resize element 9 to 25%, paste at the bottom left above the tube, duplicate,
mirror, move up on the right below the frame.
Resize element 8 to 25%, paste behind the flower.
Resize element 4 to 20%, paste at the bottom above the tube to the right,
duplicate, mirror, move by the other shoe.
Resize element 2 to 20%, paste between the shoes.
Resize element 3 to 20%, paste on the right below pink flower.
Resize element 16 to 20%, paste at the bottom being on the top layer.
Resize element 23 to 20%, paste at the bottom.
Resize element 63 to 20%, paste at the lower right below the shoe.
Resize element 19 to 50%, paste at the bottom.
Paste element 116 at the bottom being on the top layer, duplicate, mirror, flip, move
to the top right behind the frame.
Add any other elements that you would like, make it your own.
Always readjust your mask and elements how you like them before you
merge your tag, resize, sharpen.
Crop your tag to be sure no shadows or lines are on the edges.
Then add your copyright and name.
That's it
Hope you enjoyed doing my tut.
Tag for Stu
No comments:
Post a Comment