Saturday, March 4, 2023

FTU Rust & Jade Steampunk

This tut was written March 4th, 2023 for those with a basic knowledge of psp.

I am using the awesome artwork of ©Verymany
Tube is Steampunk 35
You need a license to use this tube, do not use without a license.
You can find this tube at Verymany Store HERE

I used PSP2020...but any of them should work.
FTU Rust and Jade Steampunk kit by MTA   HERE  
Check out the rest of the blog HERE
Mask of choice I used Miz Teeques's Mask 197 HERE 
Check out the rest of the blog HERE

Font of choice, I used Kingthings Pique n meex

Drop shadow is V -1 H -4, 50, 10, Black or use what you prefer.
Let's get started
*Remember to add your drop shadow as you go along*

Open a new image 800 x 800, resize paper 6 to 80%, select all, paste paper into 
selection, apply your mask, delete,
merge group. I resized mine larger to 110%.

Resize frame 4 to 80%, paste on the left, duplicate, mirror, click inside the
frames with your magic wand, expand by 5, paste paper 1, invert, delete, 
keep selected, paste your tube in the left frame, delete, select none, duplicate the tube,
mirror into the other frame.
Change the blend mode to Luminance (L)

Resize your tube to 40%, paste above the frames in the middle.

Paste element 2 on the upper right above the mask, duplicate, mirror.
Resize element 1 to 25%, paste behind the tube on one side, duplicate, mirror.
Resize element 29 to 25%, paste below the other flower on one side, duplicate, mirror.
Resize element 7 to 25%, paste above the flower on the left, duplicate, mirror.

Resize element 2 to 40%, paste behind the tube on the left, duplicate, mirror.
Resize element 30 to 25%, paste on one side on the edge of the frame, duplicate,
mirror.
Resize element 34 to 25%, paste behind the other flower, duplicate, mirror.
Resize element 4 to 25%, paste at the bottom above the tube, duplicate, mirror.
Resize element 15 to 40%, paste at the bottom above the flower.
Resize element 25 to 40%, paste on the right below the gears.
Resize element 18 to 20%, paste on the chest.
Resize element 17 to 20%, paste on the lock.

Resize element 28 to 45%, paste at the lower right being on the top layer.
Resize element 23 to 40%, paste on the lower left, below the flowers.
Resize element 24 and 26 to 25%, paste at the lower left.
Resize element 13 to 15%, paste at the bottom behind the dog on the right, duplicate,
mirror, move back by the dog, duplicate once more, move over by the goggles.
Resize element 20 to 20%, paste at the bottom being on the top layer.
Resize element 11 to 85%, paste on the frame, duplicate, mirror.
Resize element 6 to 15%, paste under the jewel, duplicate, mirror.

Resize element 40 to 35%, paste on one side below the elements, duplicate, mirror,
duplicate twice more on one and move them up behind the tube.
Paste element 38 on the mask layer at the upper left, duplicate, mirror, duplicate,
flip, duplicate, mirror.

Add any other elements you would like, make it your own.
Crop your tag to be sure no shadows or lines are on the edges.
 Then add your copyright and name.
That's it

Hope you enjoyed doing my tut.

Made a tag for Linda, awesome kit, thank you


Friday, March 3, 2023

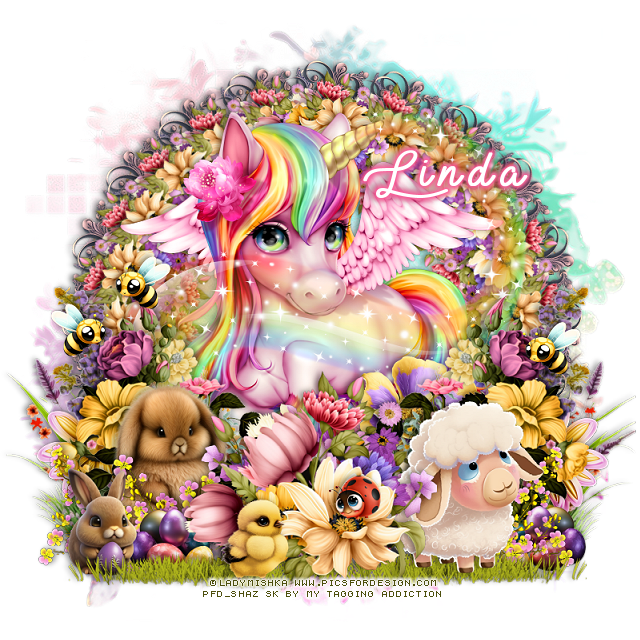
FTU Unicorn Easter

 This tut was written March 3rd, 2023 for those with a basic knowledge of psp.

I am using the awesome artwork of ©Lady Mishka
Tube is Rainbow Pony
You need a license to use this tube, do not use without a license.
You can find this tube at PFD Store HERE

I used PSP2020...but any of them should work.
FTU Happy Easter 2023 kit by MTA   HERE  
Check out the rest of the blog HERE
Mask of choice I used RD Mask 812 HERE 
Check out the rest of the blog HERE
Filters
Mura Meister Copies-Encircle

Font of choice, I used Lie to Me

Drop shadow is V -1 H -4, 40, 10, Black or use what you prefer.
Let's get started
*Remember to add your drop shadow as you go along*

Open a new image 800 x 800, paste paper 3, apply your mask, delete,
merge group.

Resize element 20 to 35%, duplicate, flip, close the flip for now, back on the 
first one apply Mura Meister Copies-Encircle, first 3 numbers on 
22, 60, 60.
Open the flipped one, apply Mura Meister Copies-Encircle, first 3 numbers on 
22, 53, 53
Resize element 48 to 25%, apply Mura Meister Copies-Encircle first 3 numbers
on 20, 66, 66, move to the mask layer below the other circles.
Resize element 28 to 85%, paste at the bottom on one side, duplicate, mirror.

Resize your tube to 20%, if using the same one I am, paste center on the flower 
circle.

Resize element 61 to 65%, paste on the right above the tube, duplicate, mirror.
Resize element 20 to 65%, paste at the bottom above the flowers.
Resize element 6 to 405, paste below the flowers above the tube off center to the right.
Resize element 7 to 25%, paste on the right below the other flowers, duplicate,
mirror.
Resize element 13 to 50%, paste at the lower right below the top flower.
Paste element 27 at the bottom below the sheep, duplicate, mirror.
Resize element 18 to 25%, paste at the lower right below the grass, duplicate, mirror.

Resize element 8 and 9 to 25%, paste on the lower left below the grass and eggs.
Resize element 31 to 50%, paste on the bottom right above the eggs, 
duplicate, mirror, move above the taller rabbit.

Resize element 41 to 20%, paste on the right, duplicate twice, mirror.
Resize element 42 to 15%, paste on the flower being on the top layer.
Resize element 14 to 25%, paste at the bottom above the flowers.

Add any other elements you would like, make it your own.
Crop your tag to be sure no shadows or lines are on the edges.
 Then add your copyright and name.
That's it

Hope you enjoyed doing my tut.

Made a tag for Linda, awesome kit, thank you


Wednesday, March 1, 2023

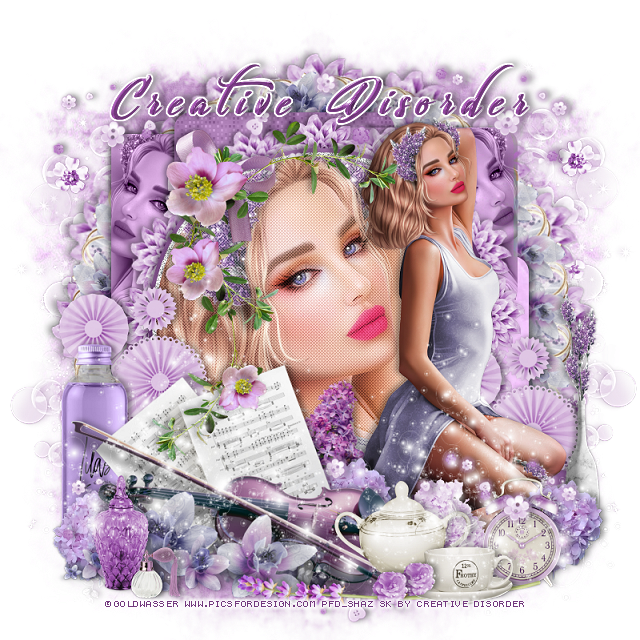
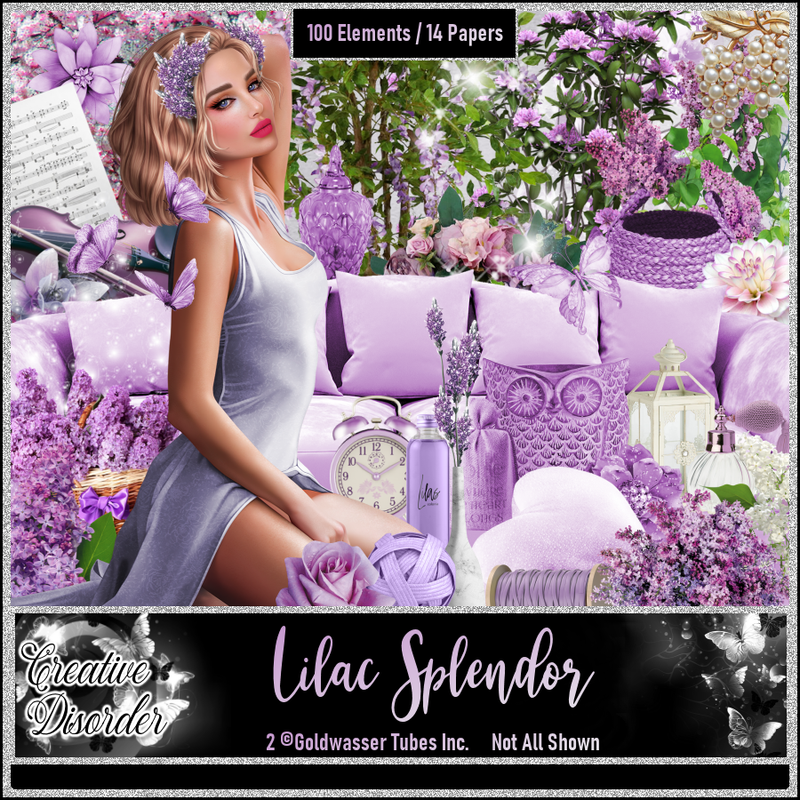
PTU Lilac Splendor


 This tut was written March 1st, 2023 for those with a basic knowledge of psp. 

I am using the awesome artwork of ©Goldwasser
2 Tubes are included in the kit
You need a license to use this tube, do not use without a license.
Use the license where you buy the kit.

I used PSP2020...but any of them should work.
PTU Lilac Splendor by Creative Disorder  HERE  HERE HERE
Kit contains 100 elements, 14 papers and 2 awesome tubes by Goldwasser
Check out her blog HERE
Template 808 by Millie's PSP Madness HERE
Check out the rest of the blog
Mask by RD Mask 893 HERE
Check out the rest of the blog HERE
Filters
xero-Fritillary
Screen Works-Light Gauze
Mura Meister Copies-Encircle

Font of choice, I used Libertinage

Drop shadow is V -1 H -3, 50, 10, or use what you prefer.
Let's get started
*Remember to add your drop shadow as you go along*

Open the template, duplicate the original by holding down the shift key and
hitting the d key, close the original.
Delete the credits.

Go to Image, Canvas size 800 x 800, select all, new layer, paste paper 10,
apply your mask, duplicate, mirror.

Merge layers 1 and 2 together, select all, float, defloat, resize paper 1 to
75%, paste, invert, delete, also delete each layer of the template as 
you go along, keep selected, resize your tube to 55%, mirror, paste on the left,
delete, select none.
Change the blend mode to Luminance(L).
Watch for shadows on the bottom of your tag.

Merge layers 3 and 4 together, select all, float, defloat, paste paper 11, invert, delete.
Apply the xero filter-Fritillary with these numbers
5, 30, 50, 30

Merge layers 5 and 6, select all, mirror paper 10, move where you like,
invert, delete, keep selected, resize your tube to 55%, paste on the top square,
delete, select none.
Change the blend mode to Luminance(L).
Layer 7, paste paper 11, invert, delete.
Layer 8 add noise at 100%.

Layer 9, paste paper 6, invert, delete, keep selected, paste your close up,
delete, select none.
Duplicate the tube, go to Adjust, Blur, Gaussian blur, number on 5, change the
blend mode to Screen.
Apply the Screen Works filter-Light Gauze, merge down.

Resize your tube to 35%, paste on the right.

Resize element 3 to 50%, paste on the circle behind the tube on the left.
Resize element 15 to 20%, apply Mura Meister copies-Encircle, first 3 numbers
on 16, 50, 50, move below the circle of the template, duplicate, resize larger to 132%,
move above the mask layer.
Resize element 1 to 25%, apply Mura Meister Copies-encircle first 3 numbers 
on 22, 70, 70, move above the flower circle layer.

Resize element 66 to 50%, paste behind the tube and down some, erase any stem 
showing.
Resize element 2 to 50%, paste at the lower left above the tube.
Move the hanging flower above the violin.
Resize element 34 to 30%, paste at the bottom below the violin.
Resize element 44 and 45 to 25%, paste at the bottom above the violin.

Resize element 54 to 35%, paste at the lower right below the cup.
Resize element 55 to 60%, paste on the left below the violin.
Resize element 11 to 5%, paste at the lower left above the bottle, duplicate a 
couple of times and move over to the right more on each one.
Resize element 27 to 10%, paste at the bottom above the cup, duplicate, move over
a little.
Resize element 33 and 44 to 25%, paste at the lower left.
Resize element 92 to 65%, paste at the bottom below the violin, duplicate, move to
the top below the circle.
Resize element 70 to 60%, free rotate to the left, paste at the bottom below the cup.
Resize element 86 to 35%, paste on the right below the tube, duplicate, mirror, 
move to the left below the bottle.
Paste element 99 on the mask on the left, duplicate, mirror.
Resize element 98 to 50%, paste on the lower left, duplicate, mirror, erase some off
the tube if you like.

Add any other elements that you would like, make it your own.
Always readjust your mask and elements how you like them before you
 merge your tag, resize, sharpen.

Crop your tag to be sure no shadows or lines are on the edges.
 Then add your copyright and name.
That's it

Hope you enjoyed doing my tut.